Loading...
Loading...
Loading...
Loading...
Loading...
Loading...
Loading...
Loading...
The first step to using Datalogz is to create a connector for the organization.
A connector is an access for Datalogz to connect to a BI environment. We recommend organizations create single connector per each BI platform. Currently, Datalogz support connection with PowerBI, Tableau, Qlik, and Spotfire.
When a connector is created, Datalogz automatically extracts BI metadata and creates default monitors.
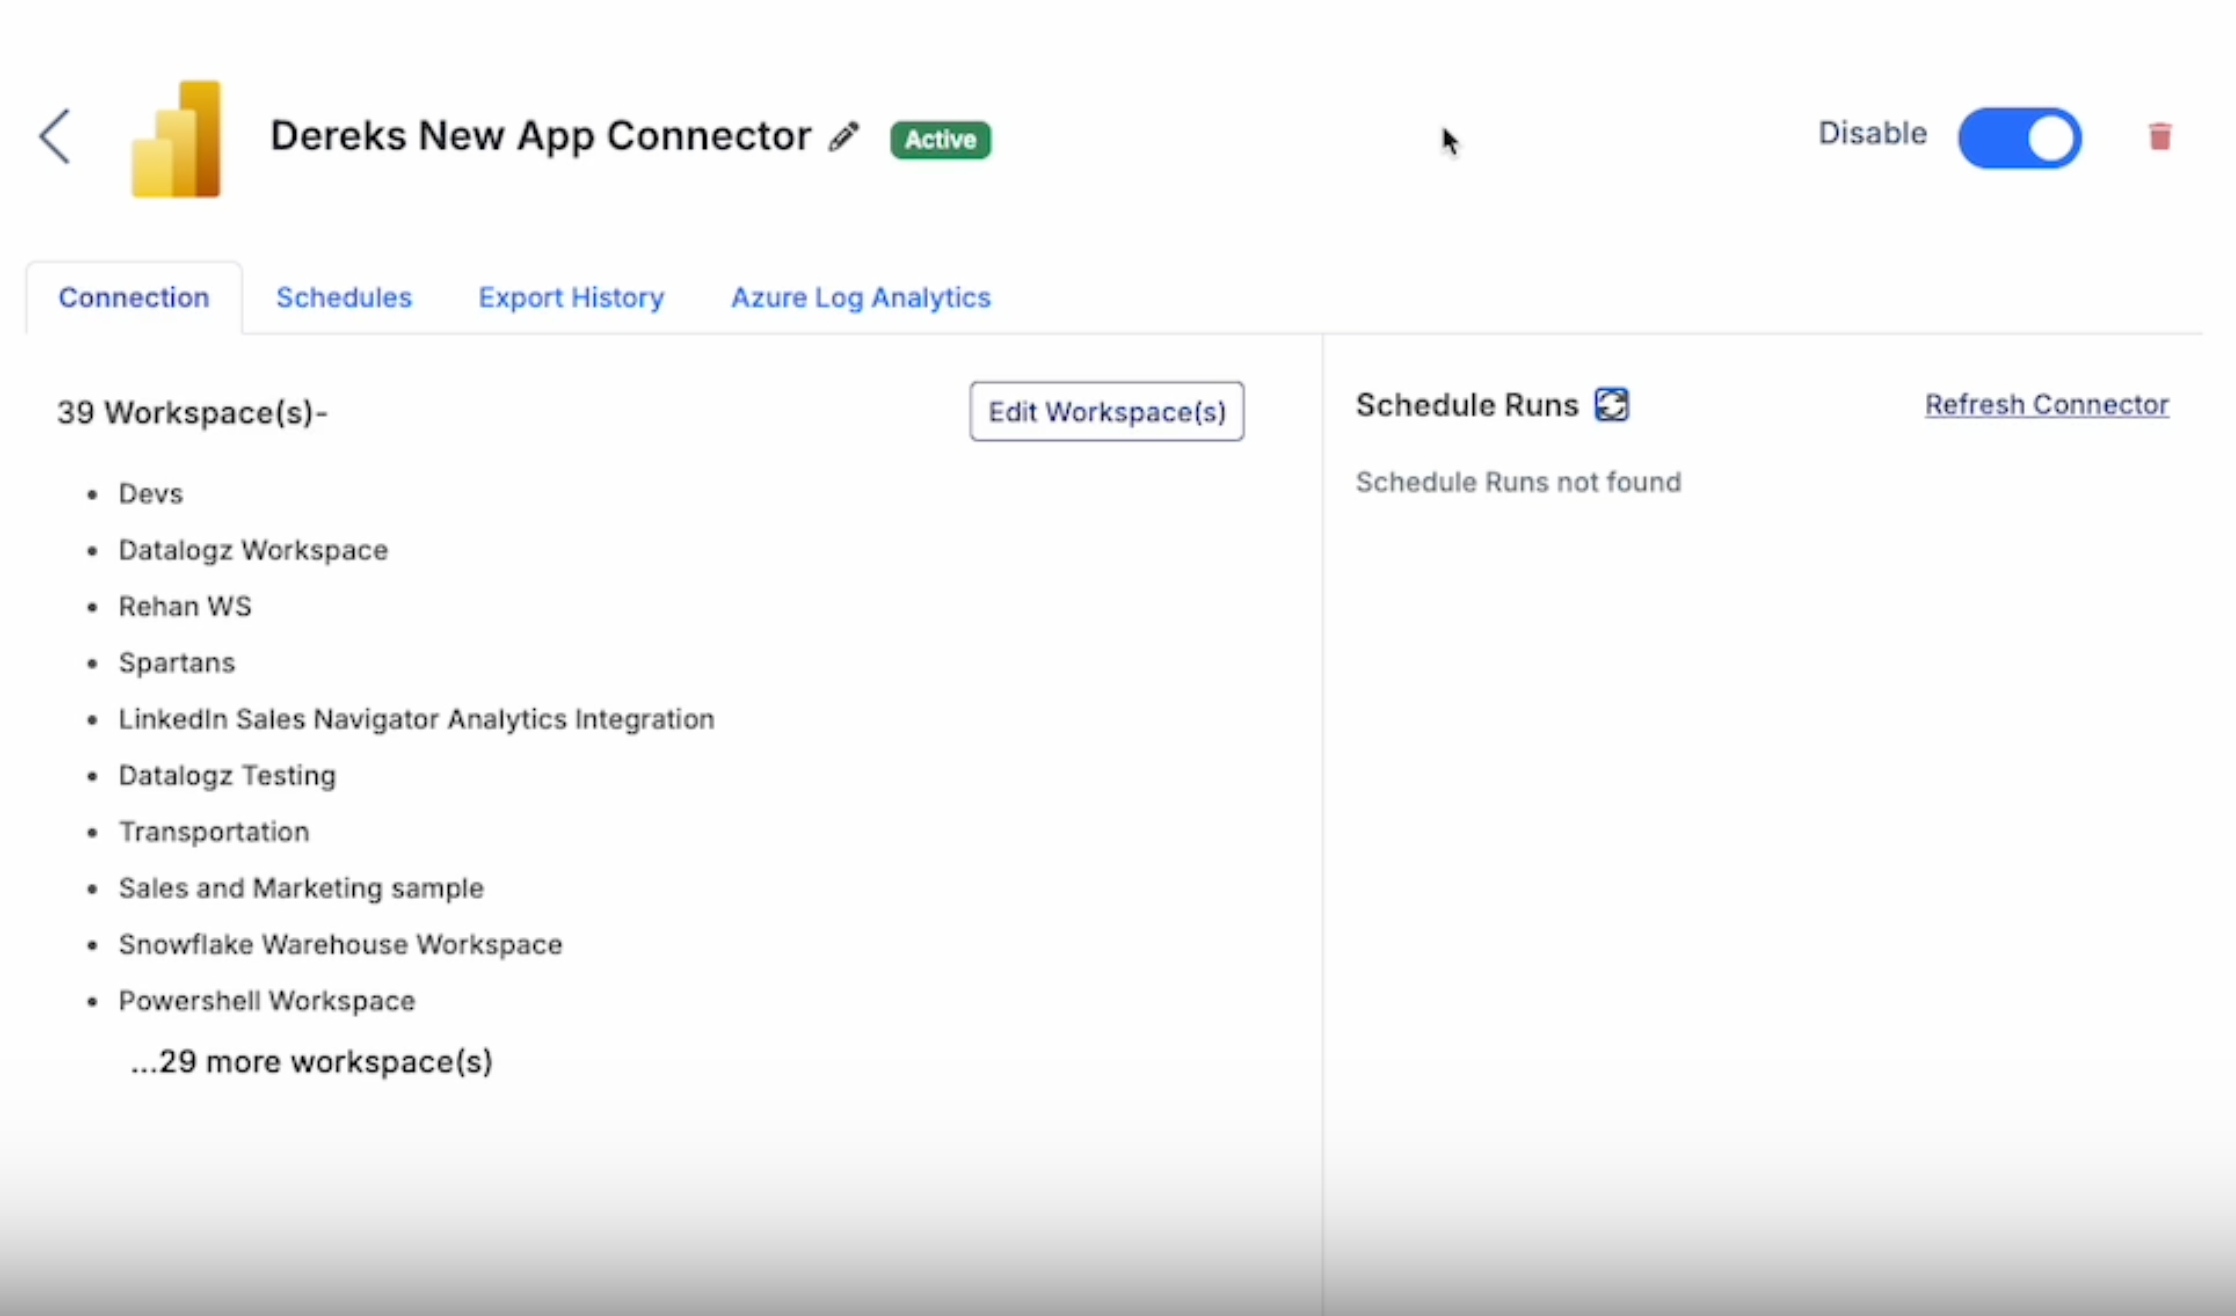
Navigate to Connectors and choose a connector by clicking the connector name.
Admins will be able to:
Edit connector name
Edit projects/workspaces/streams
Modify fresh schedule
Export connector history
Manually refresh connector
Disable connector
Only Root User and Admin have access to Connector Settings.
Toggle on/off to enable/disable the connector.
You can create multiple connectors in Datalogz under a single account, as the organization might use multiple BI tools (e.g. Tableau, Qlik).
Only Root Users can create new connectors.
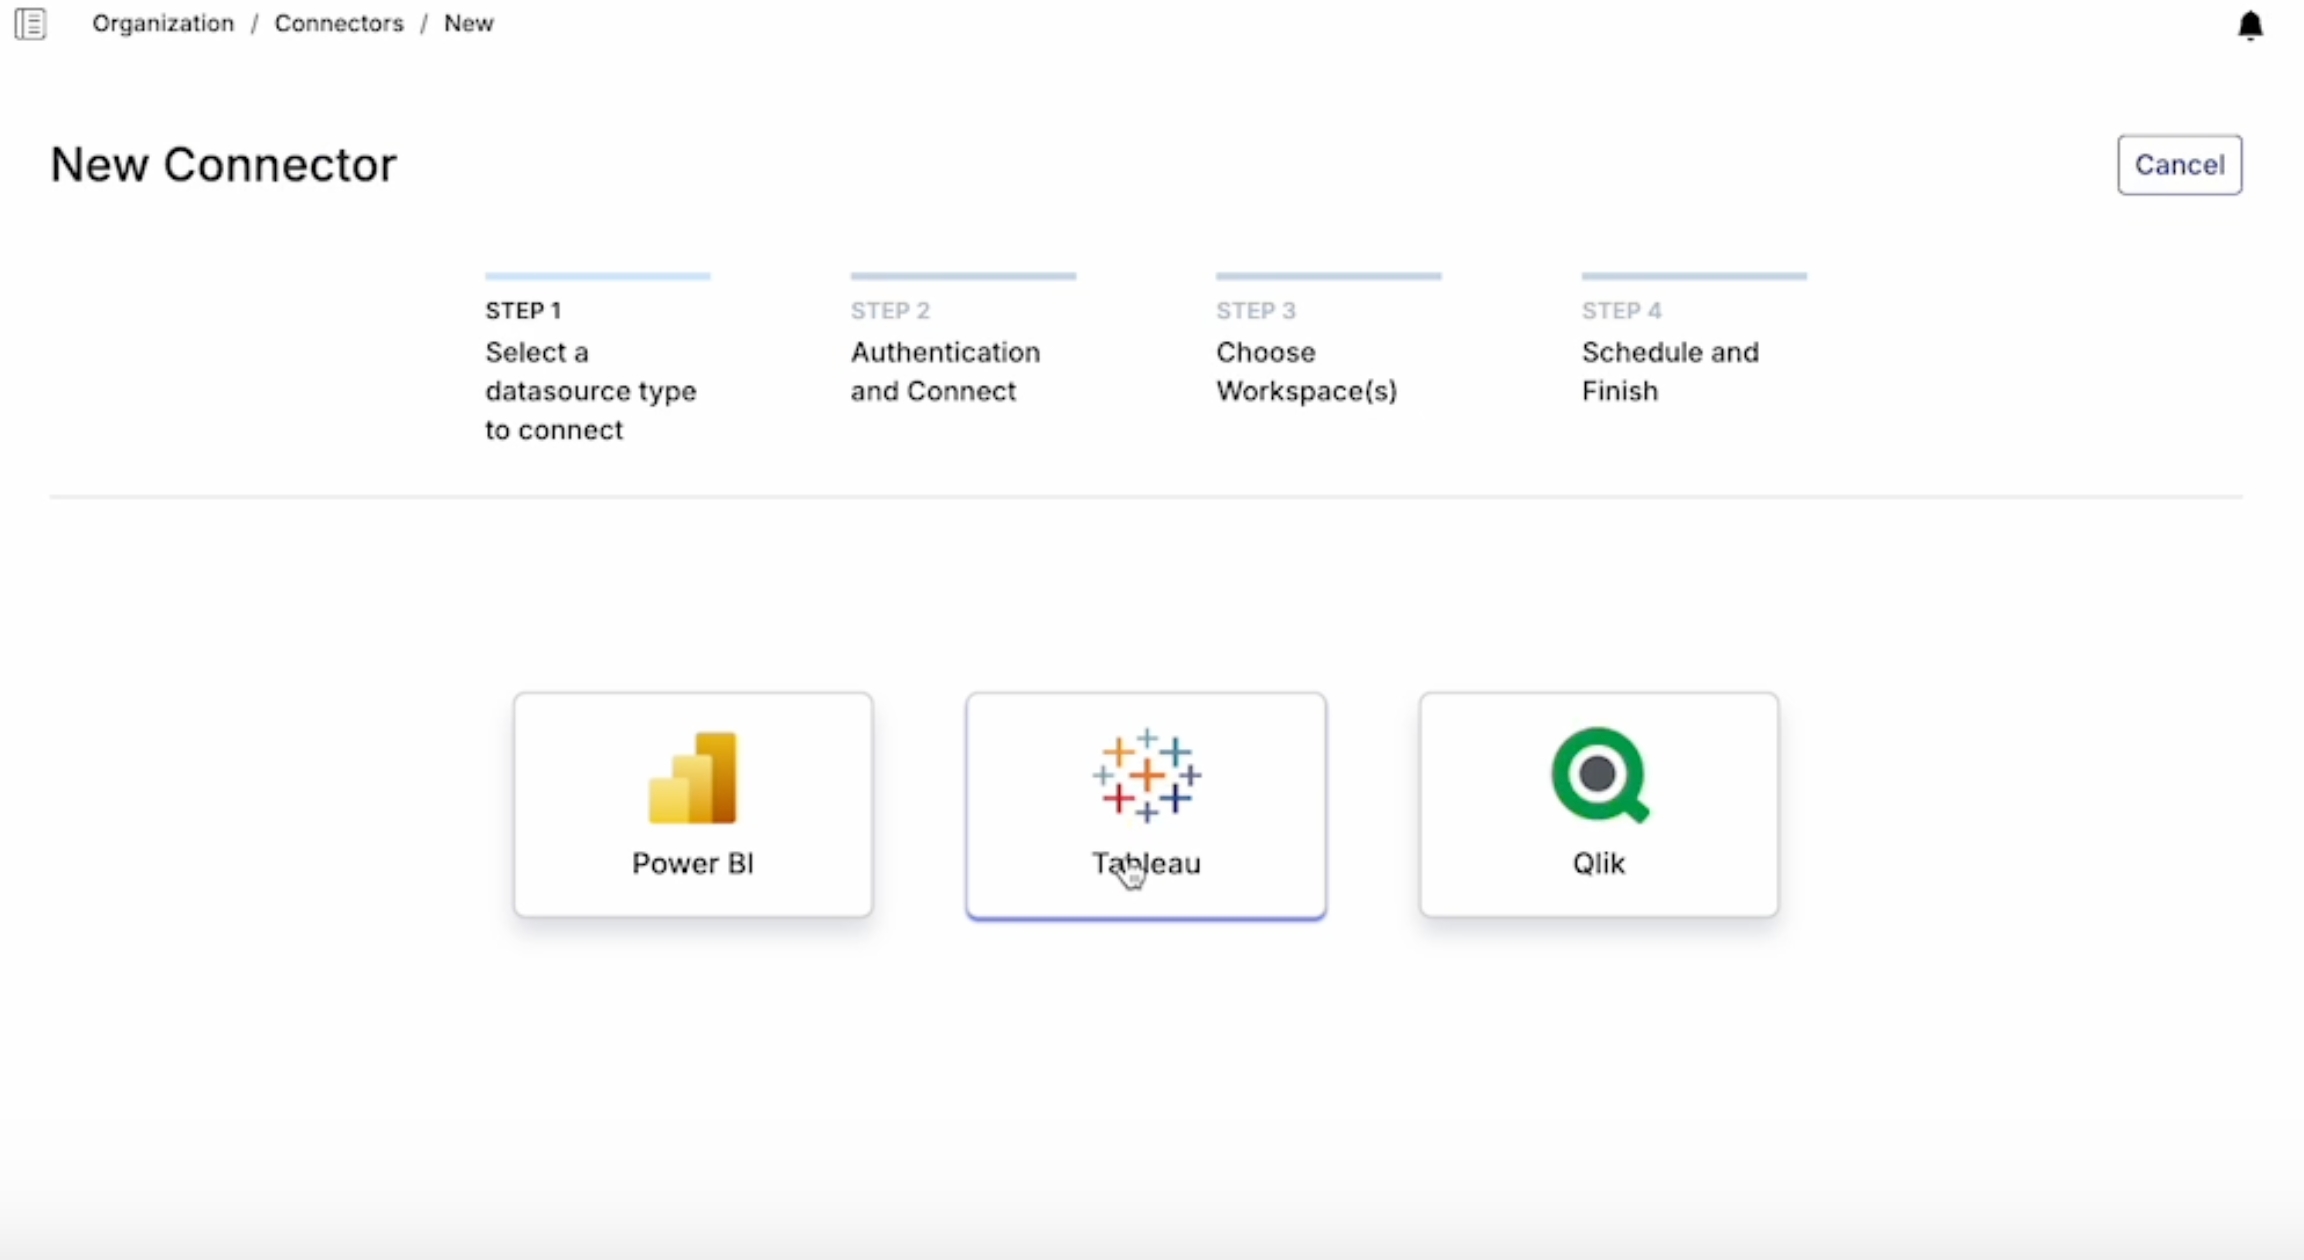
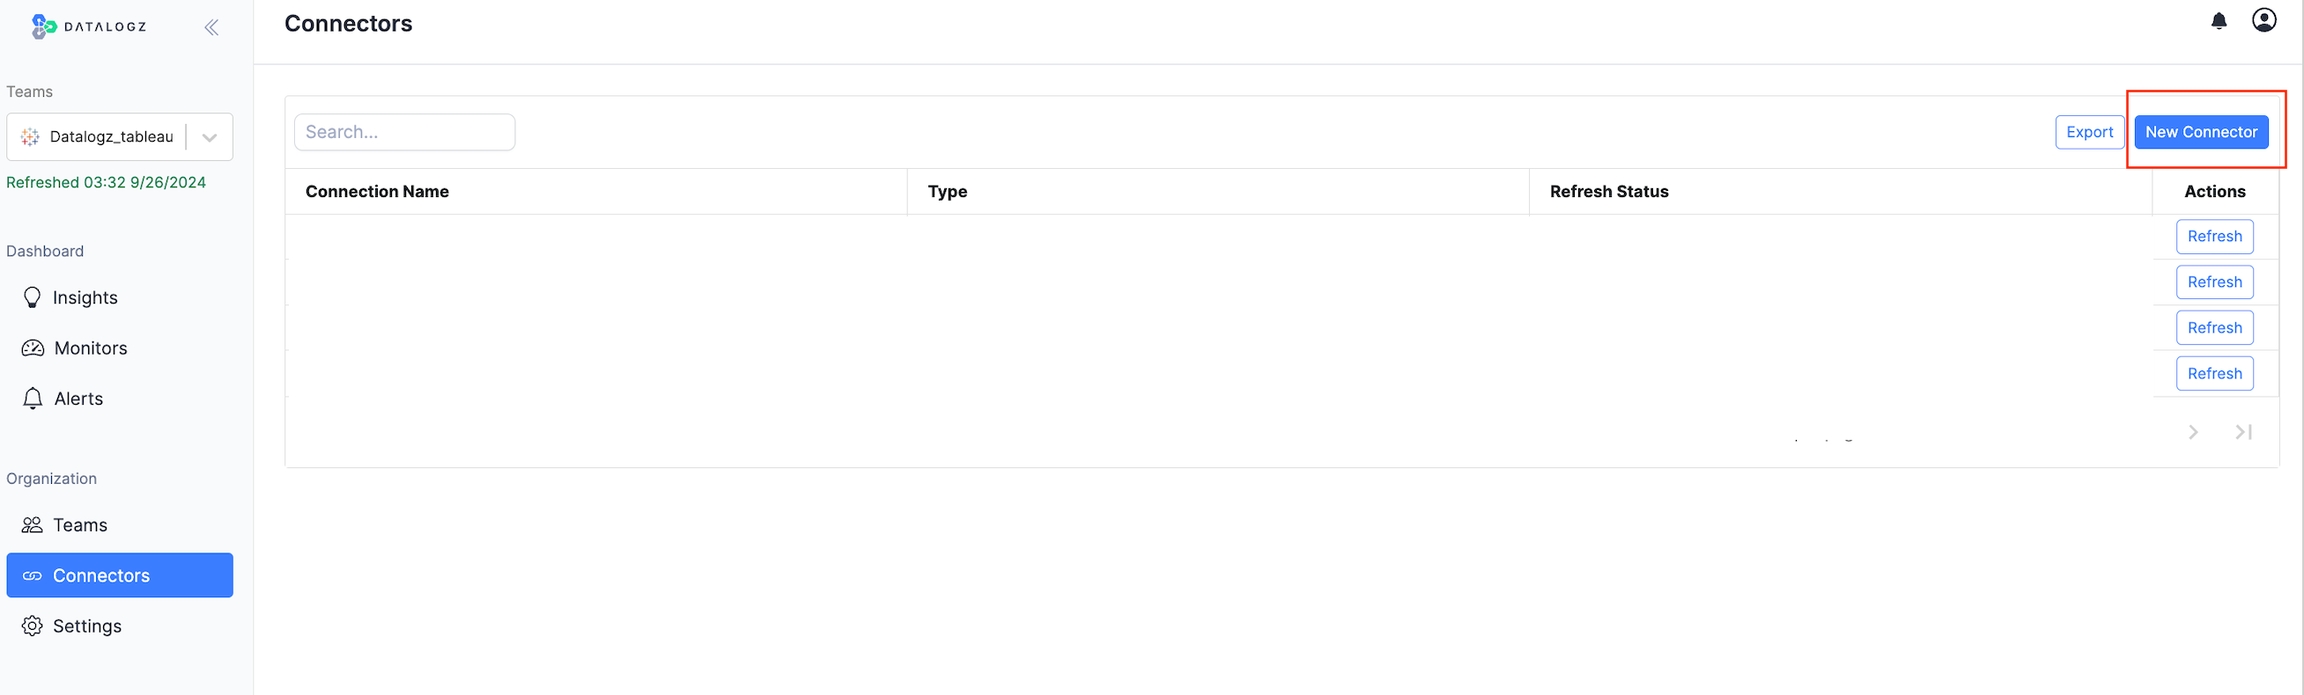
To create a new connector:
Click New Connector
Choose the type of connector
Welcome to the Datalogz Infrastructure Deployment Guide. This document provides comprehensive instructions for deploying the Datalogz platform either on Amazon Web Services (AWS) or on bare metal servers. It is intended for DevOps engineers, system administrators, and IT professionals responsible for setting up and managing Datalogz infrastructure within your organization.
The guide includes step-by-step procedures, diagrams, and best practices to ensure a smooth deployment. All diagrams are dynamically generated using D2 and can be found in the diagrams directory.
Before you begin the deployment process, ensure that you have met the following prerequisites:
Access Permissions:
For AWS deployment, an AWS account with permissions to create and manage resources such as EC2 instances, RDS Instances, S3 buckets, and IAM roles.
For bare metal deployment, administrative access to the physical or virtual servers.
Network Requirements:
Open ports as required by Datalogz services (e.g., HTTP/HTTPS ports, database ports).
SSH access to servers for Ansible to run playbooks.
SSH Keys:
A valid SSH key pair for accessing the servers. The private key should be accessible from the machine where Ansible is run.
AWS EC2 Instance
Backend VM
Recommended size: 8 vCPU, 16 GB RAM
Recommended instance type: c7i.2xlarge
Security Group associated to backend VM
Frontend VM
Recommended size: 4 vCPU, 8 GB RAM
Recommended instance type: c7i.xlarge
Security Group associated to frontend VM
Deploying Datalogz on AWS involves provisioning infrastructure using Terraform and configuring instances using Ansible. This approach automates the deployment process, ensuring consistency and scalability.
Ensure that the following tools are installed on your local machine:
Terraform
Installation Guide: Install Terraform
Verify installation: terraform -v
AWS CLI
Installation Guide: Install AWS CLI
Verify installation: aws --version
Ansible
Installation Guide: Install Ansible
Verify installation: ansible --version
Set up your AWS credentials so that the AWS CLI and Terraform can authenticate with your AWS account.
Option 1: Using Environment Variables
Option 2: Using AWS CLI Configuration
Run the AWS configure command: aws configure
You will be prompted to enter your AWS Access Key ID, Secret Access Key, Default Region, and Output Format.
Test your AWS configuration by trying to list your current S3 buckets: aws s3 ls
Change your current directory to the AWS Terraform configuration folder: cd aws
Initialize the Terraform working directory. This command downloads the necessary provider plugins: terraform init
Inspect the variables.tf file to understand the variables required for deployment, such as AWS Region, S3 Bucket name, and EC2 Key Name.
Generate and review the execution plan to understand the resources that will be created: terraform plan
Review the Plan:
Ensure that the resources and configurations match your expectations.
Check for any unintended changes to existing infrastructure.
Apply the execution plan to deploy the infrastructure: terraform apply
Confirmation:
You will be prompted to confirm the deployment. Type yes to proceed.
Deployment Duration:
The deployment typically takes around 15-25 minutes.
After Terraform completes:
State File:
Ensure that the terraform.tfstate file has been updated.
Ansible uses a dynamic inventory plugin to find the IP address of the EC2 instance based on the instance Name tag.
Location: Change directory to the Ansible folder: cd ../ansible
Update the ansible.cfg file:
Private Key File:
Set the private_key_file parameter to the path of your SSH private key.
Execute the Ansible playbook to configure the EC2 instances: ansible-playbook deploy.yml -v
Verbose Mode:
The v flag enables verbose output. Use vvv for even more detailed logs.
Common Issues:
If you encounter SSH authentication errors, verify that the SSH key has the correct permissions (chmod 600 key.pem).
After the playbook runs:
Services Check:
SSH into the instances and verify that the Datalogz containers are running.
Application Test:
Access the application URL to ensure it is functioning correctly.
Datalogz offers multiple options for users to log in and allows Root User and Admin to restrict methods for added security.
Users can authenticate into Datalogz using Google authentication when using a Google-supported email address.
Users can authenticate into Datalogz using Microsoft authentication using a Microsoft-supported email address.
With SAML enabled, users can log in through their identity provider's website by selecting the SAML option on the login page.
Once the organization enables SAML, all members must log in using SAML.
Create teams in your organization to assign different projects/workspaces/streams.
After the initial onboarding, by default, Datalogz will generate a team with the highest privileges for your organization. Root Users can create and split teams. Any user can be part of one or many teams.
To group users
who work together frequently
who work on one area of work, such as finance, marketing, etc.
who share the same level of access, such as executives, global admin, etc.
The teams you are a member of will be listed in Team and in the top-left dropdown.
The current team you navigate in will be shown in the field of the dropdown.
Go to Teams, click on New Team in the upper right of the table.
Create a name for the team
Assign a connector
Assign Platform Contexts
(Optional) Select Users
You can assign only one connector to one team at a time.
Timezone is automatically set at localtime based on the user's IP address.
All members of a team can view their team. Only Root User can create new teams. Both Root User and Admin can invite members to their teams. Anyone can view default insights, default monitors, and default alerts. Members in teams can view team insights, team monitors, and team alerts, as long as they are not private.
Deleting a team will not delete a user. But it will permanently delete any connectors and platform contexts associated with it. This can't be undone, and the data cannot be recovered.
This guide will walk you through how to set up Qlik Connector in Datalogz using the Virtual Proxy Authentication Method.
Time estimated: 6 mins.
Hostname, the address at which we access Click.
Virtual Proxy details
(Optional) N-Printing details
Log in to your Datalogz account
Navigate to Connector in the sidebar, and click New Connector
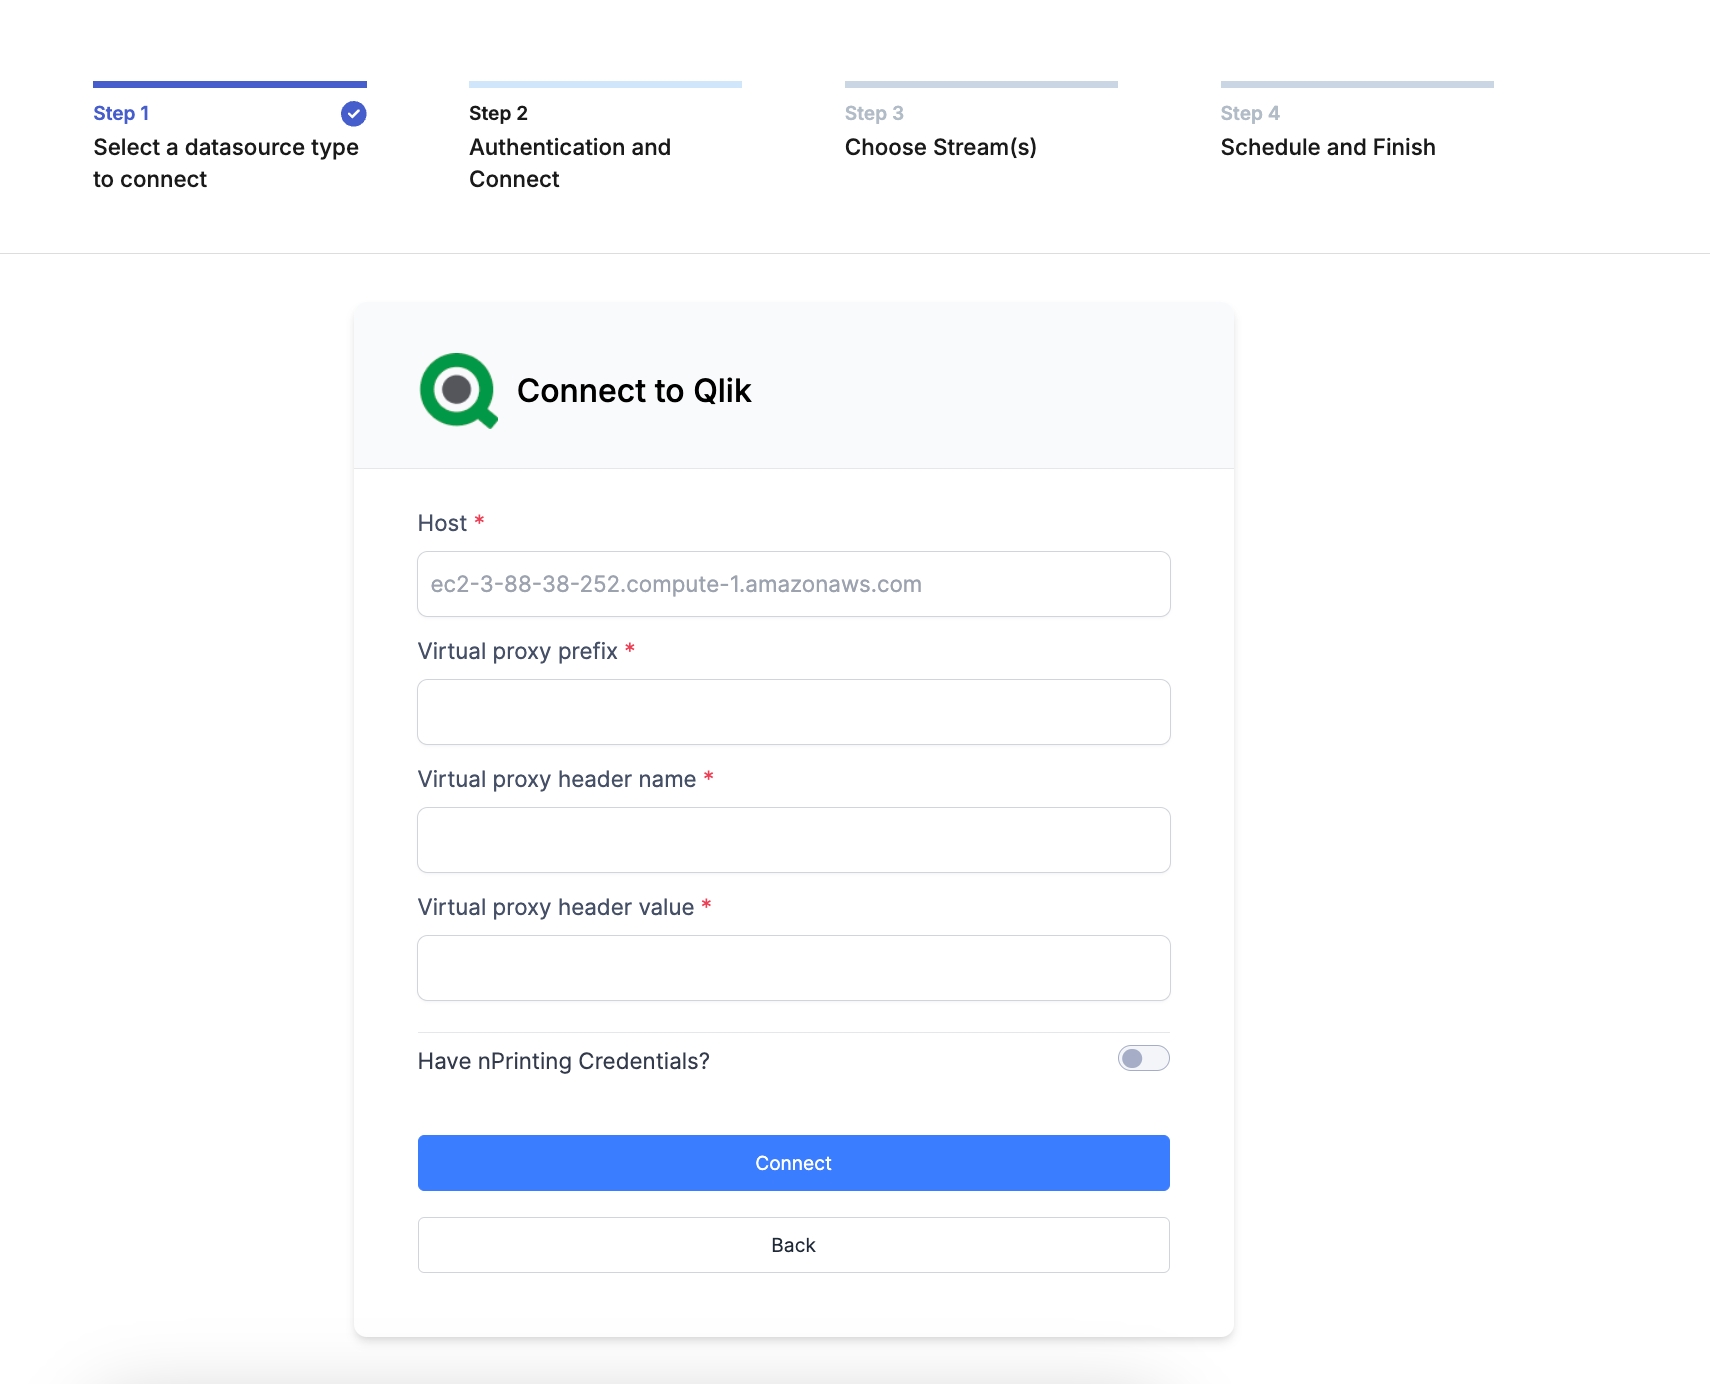
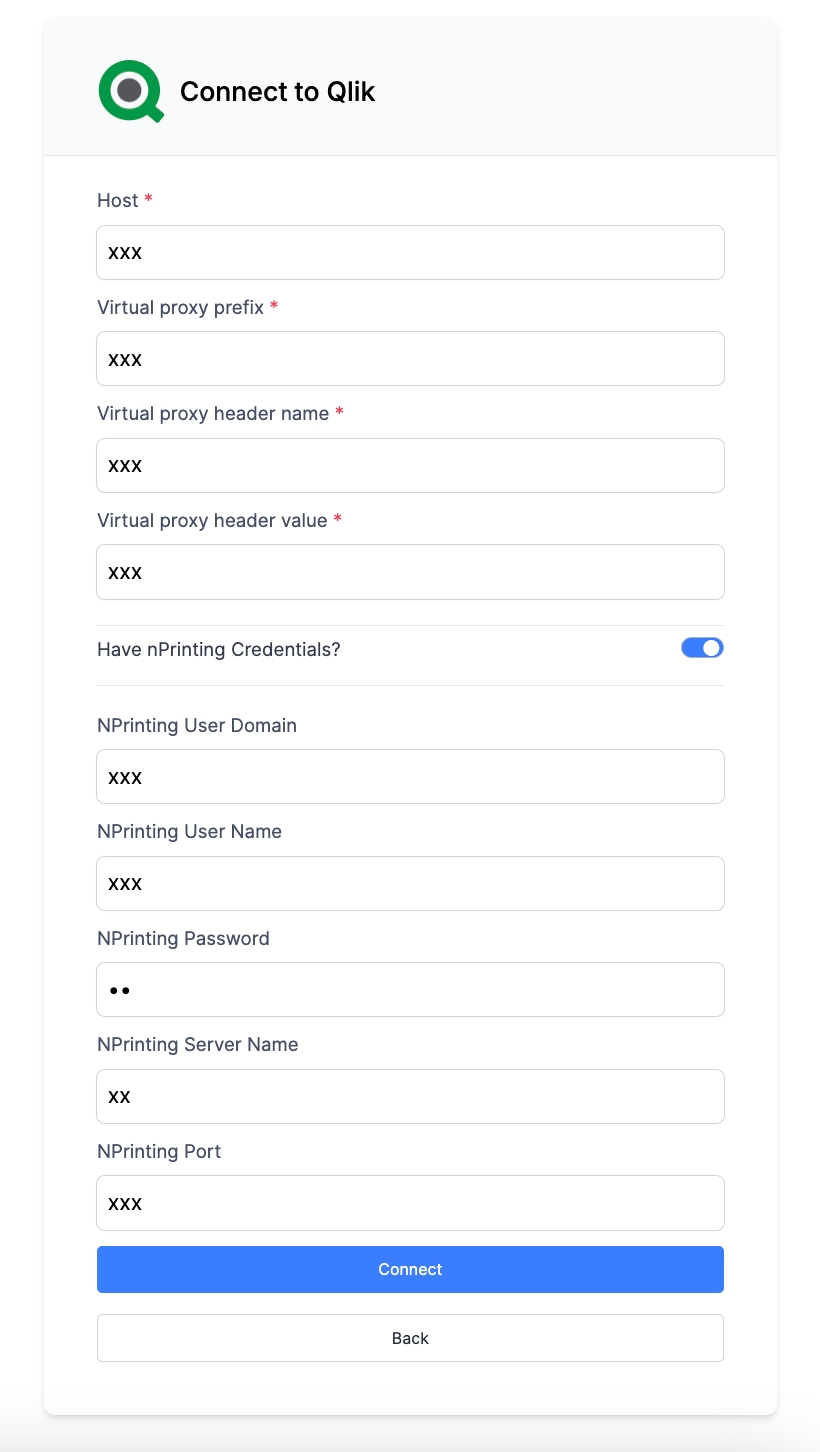
Choose Qlik
Copy-paste
Hostname, the address at which we access Click.
Virtual Proxy details
(Optional) N-Printing details
Select Streams to extract.
For more questions, please contact Datalogz support support@datalogz.io
This guide will walk you through how to set up a Tableau connector in Datalogz via Tableau Cloud.
Time estimated: 4 mins.
Log in to your Datalogz account → https://app.datalogz.io/#/organization/connectors
Sign in to Tableau Cloud https://sso.online.tableau.com/public/idp/SSO
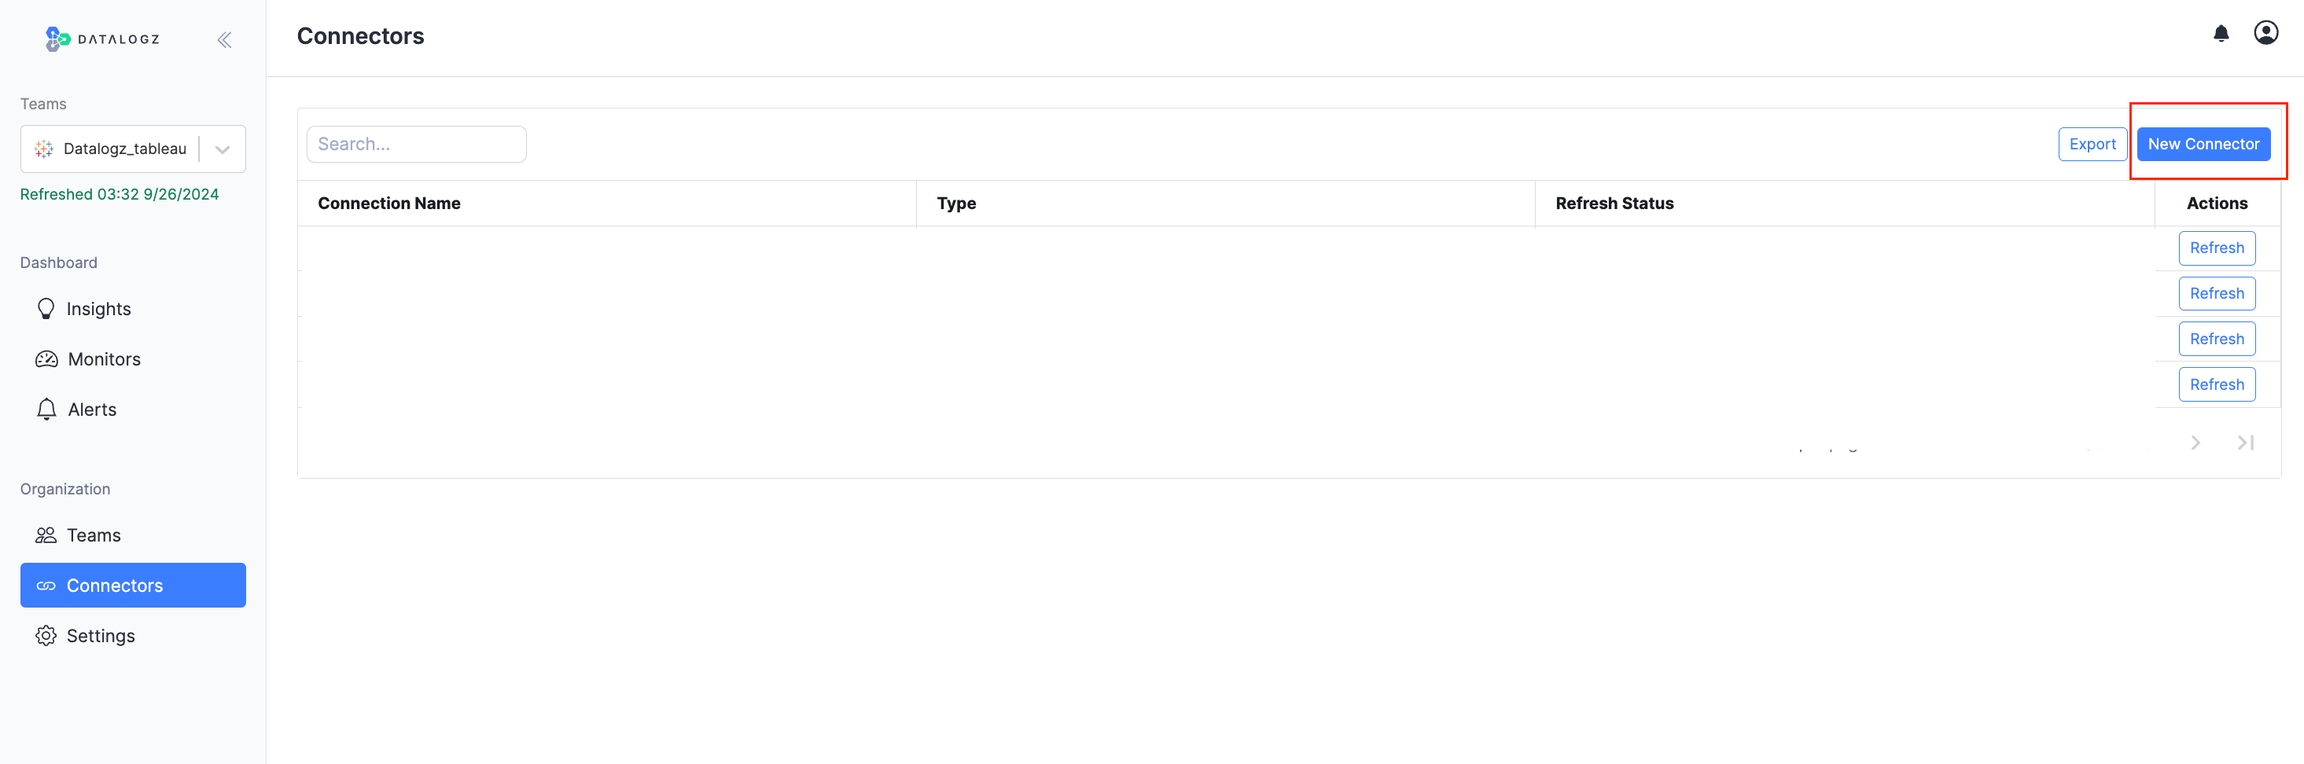
Navigate to Connector in the sidebar, and click New Connector
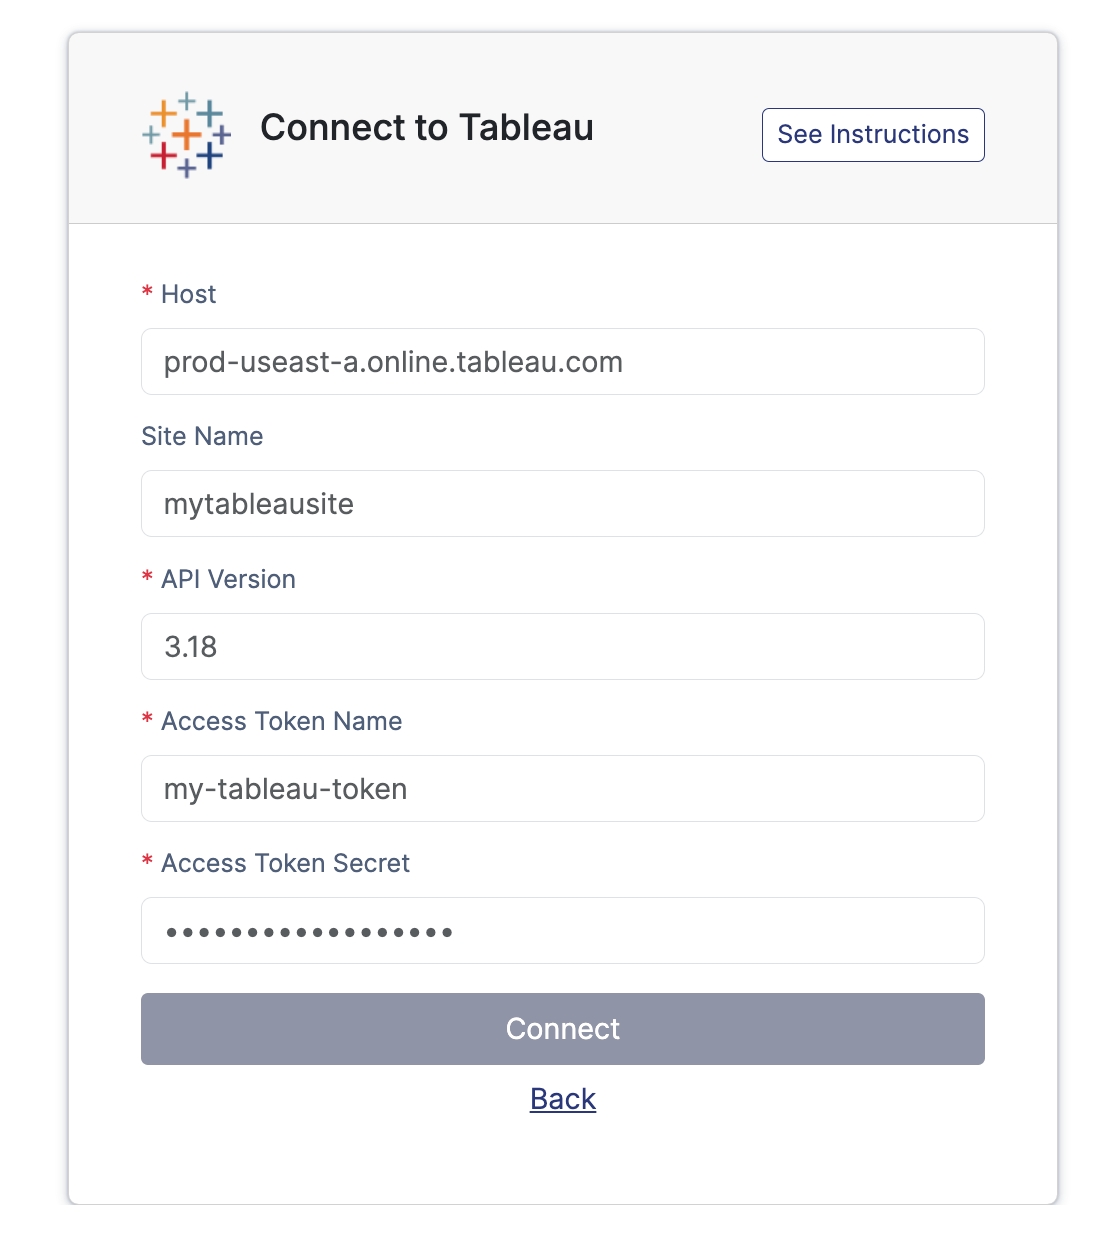
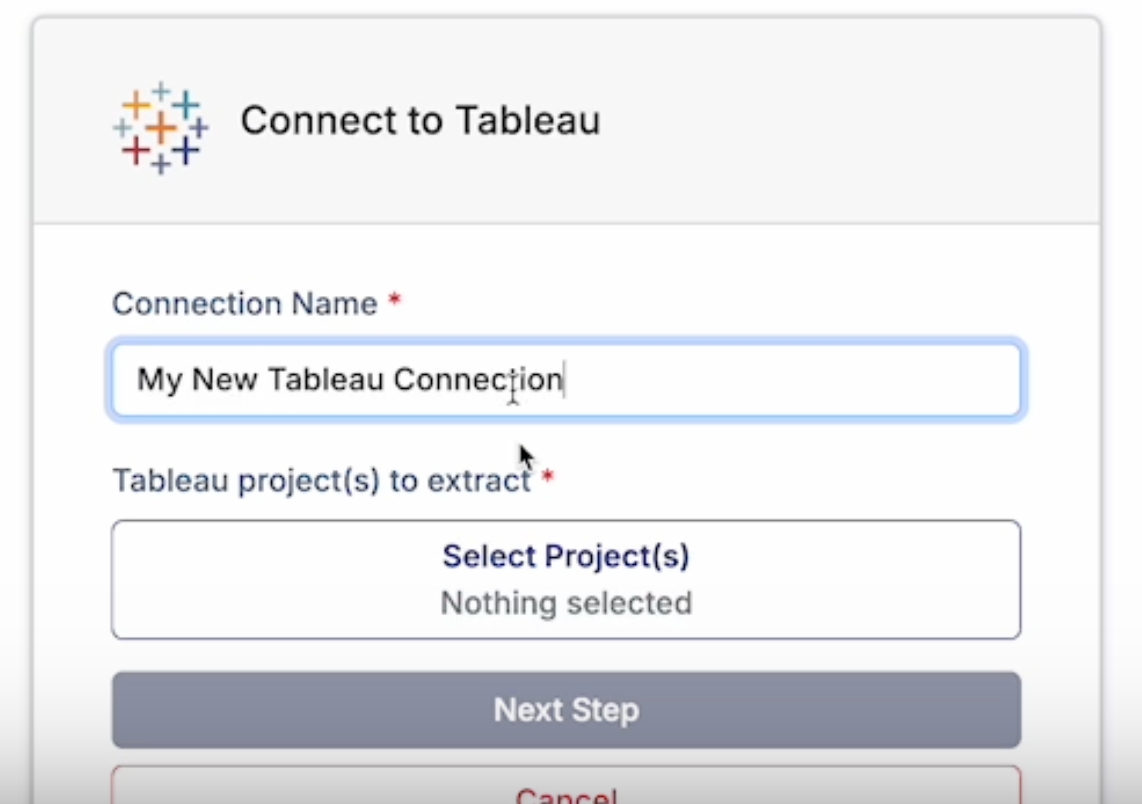
Choose Tableau
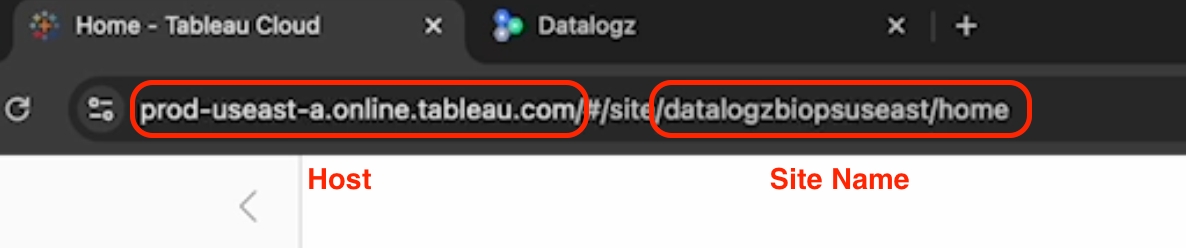
Copy-paste Host and Site Name in the URL
Find the latest Rest API Version
https://help.tableau.com/current/api/rest_api/en-us/REST/rest_api_whats_new.htm
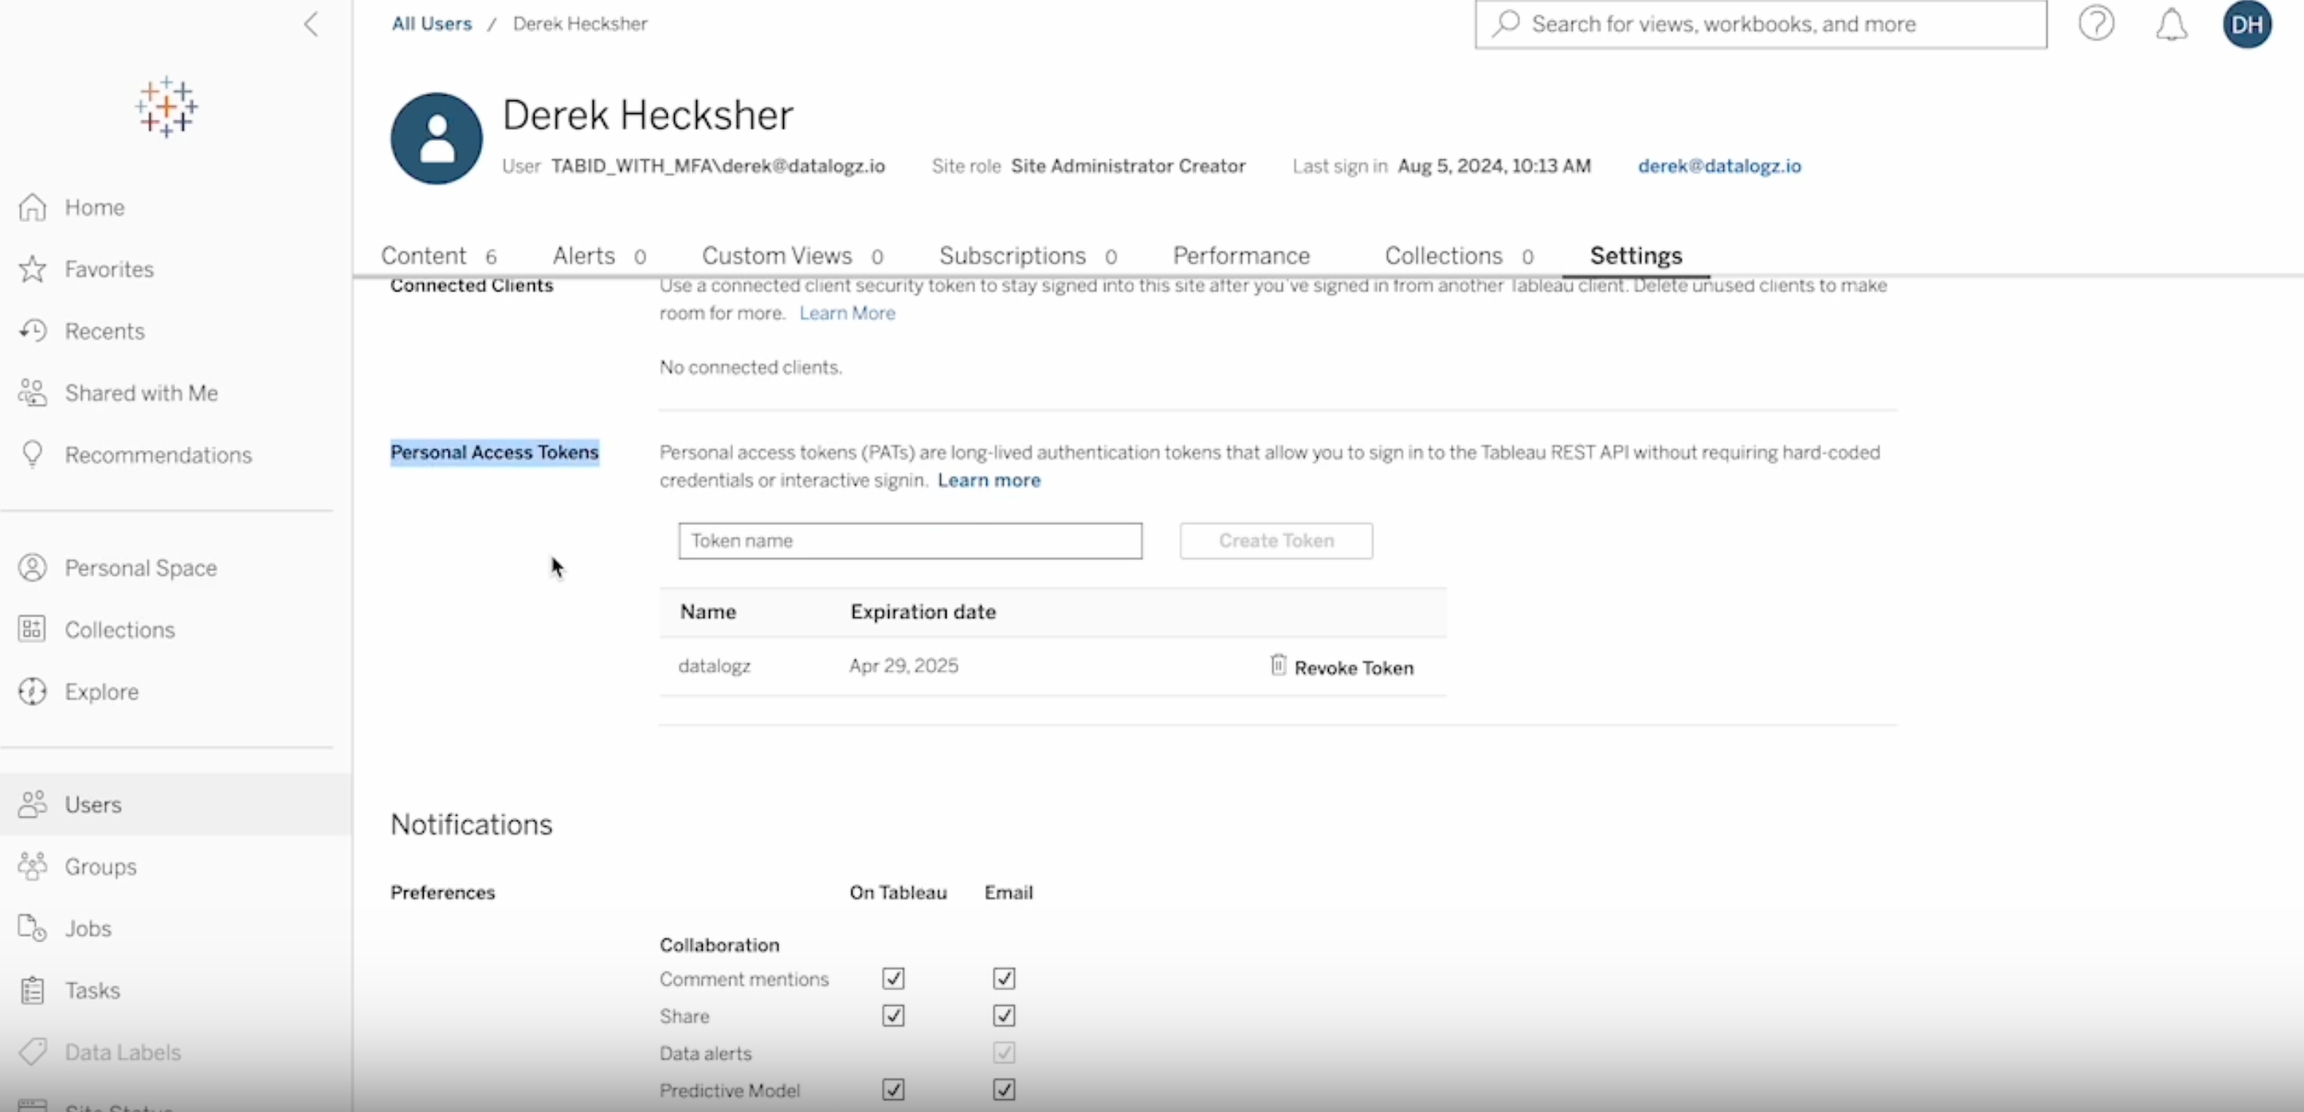
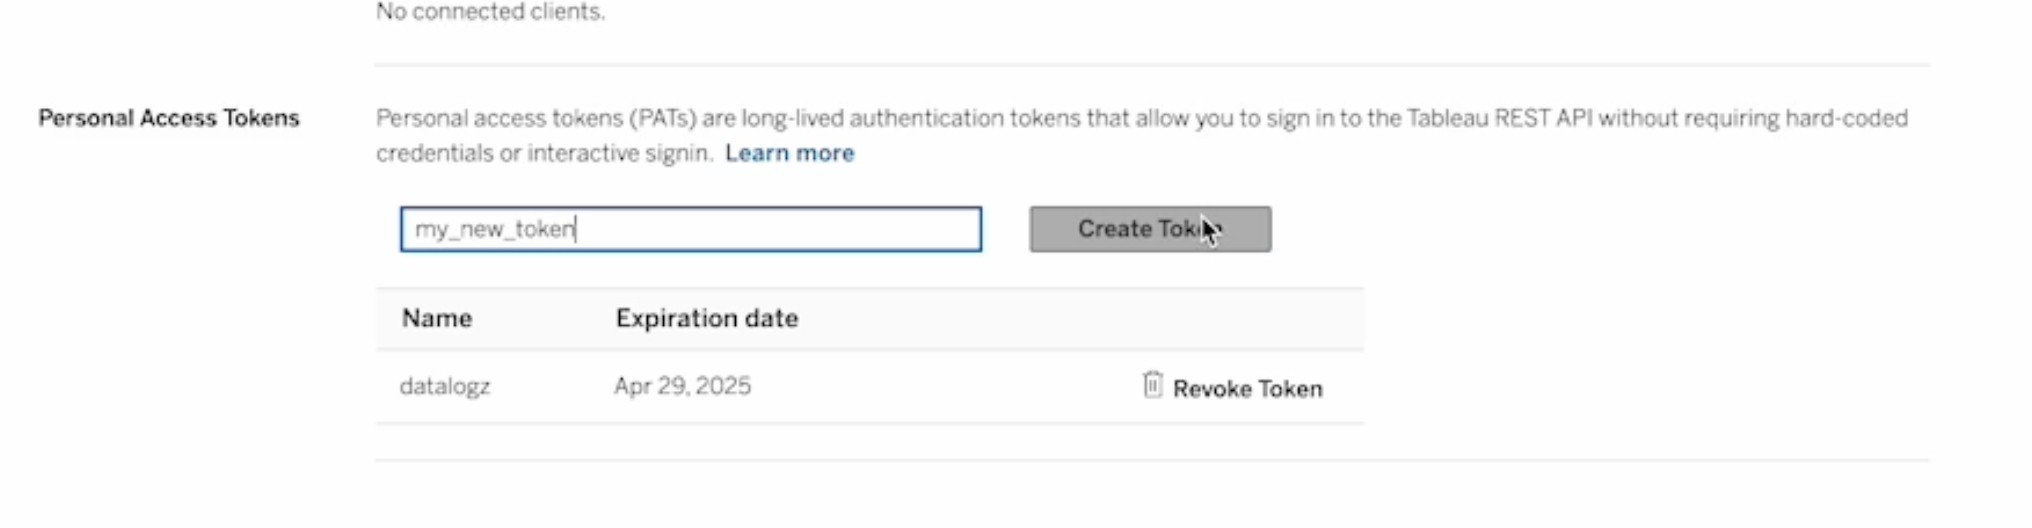
In the Tableau home screen, click on the user profile icon. Under account settings, find personal access tokens.
Name & create a new token
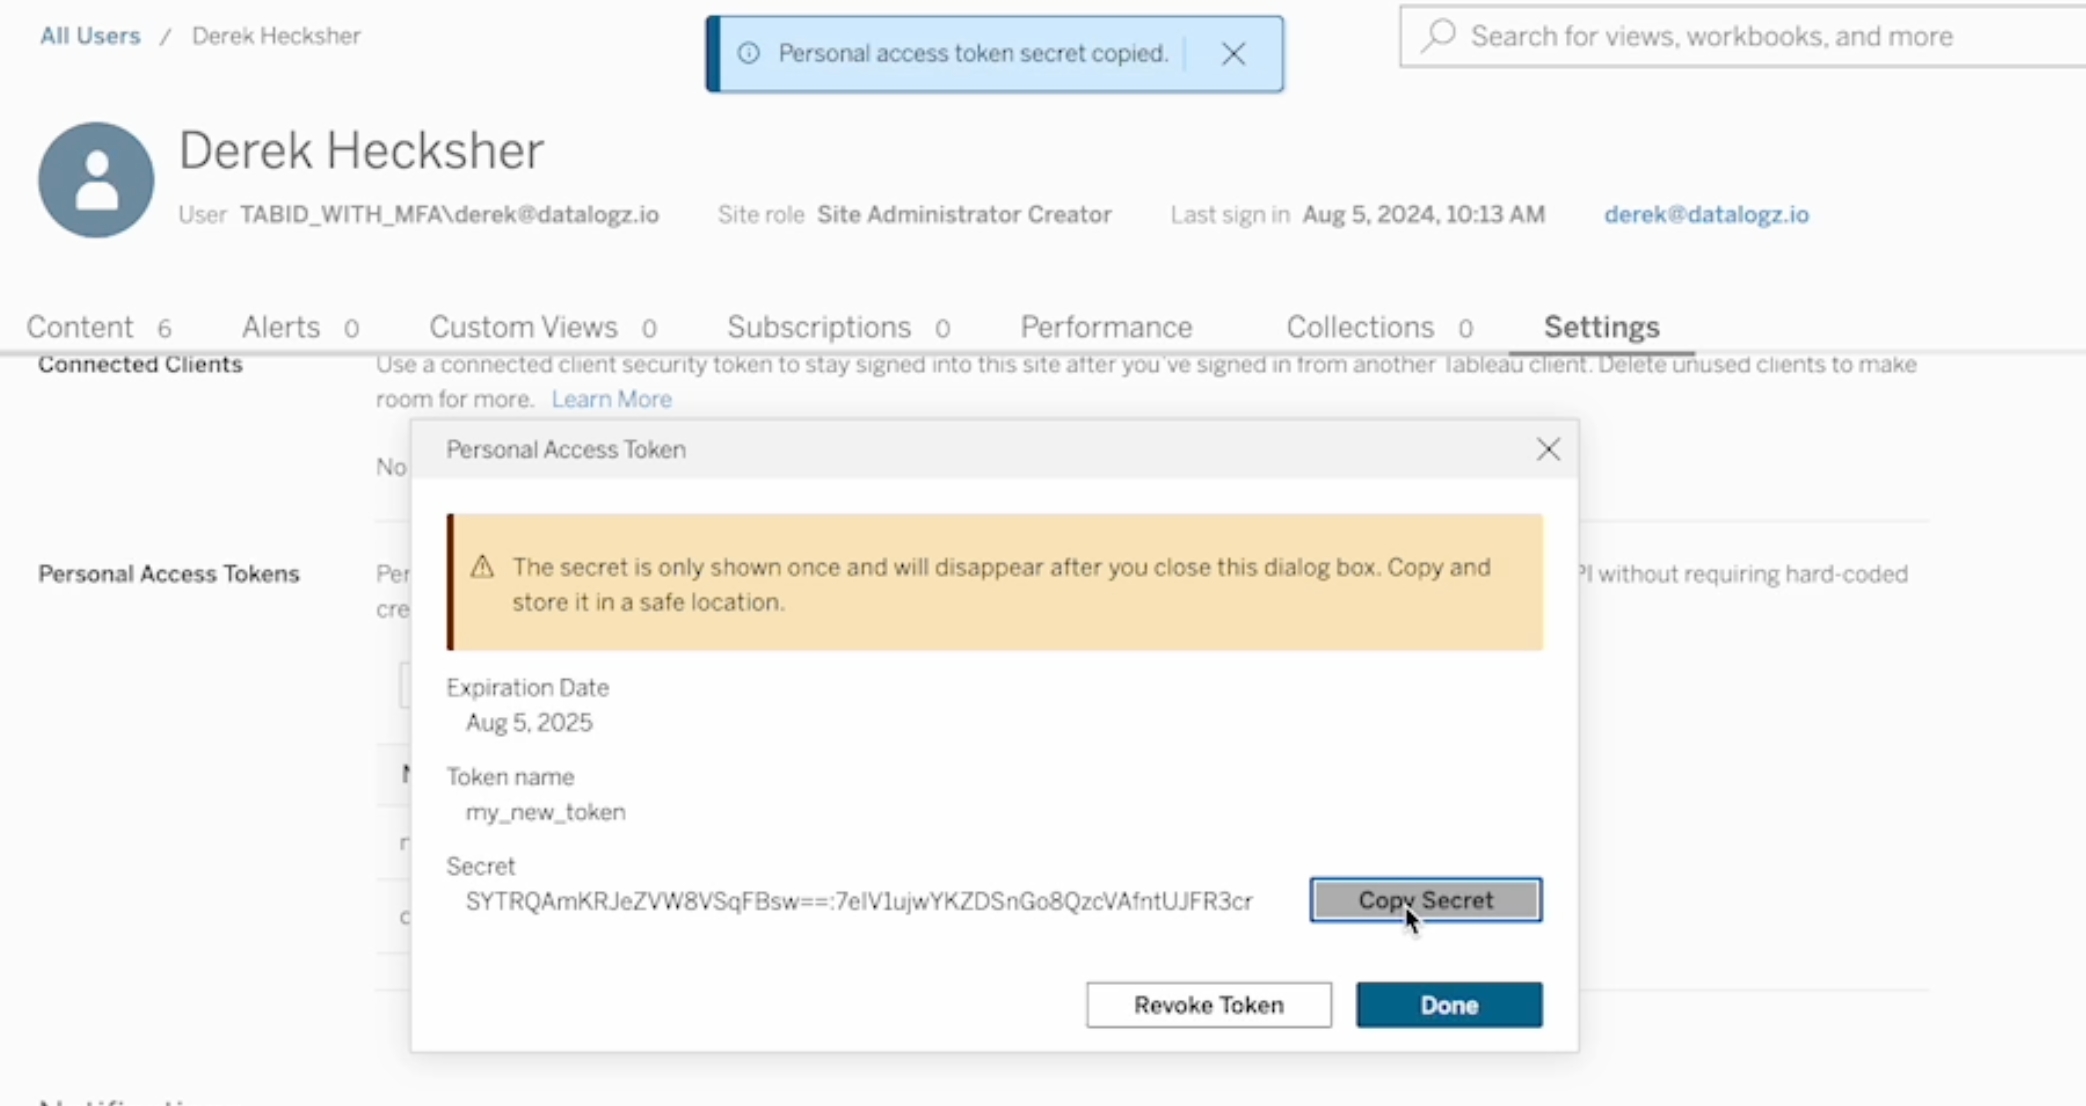
Copy-paste Token details, and connect the connector
Secret to Access Token Secret < Warning: this Secret will disappear after closing this dialog box>
Token Name to Access Token Name
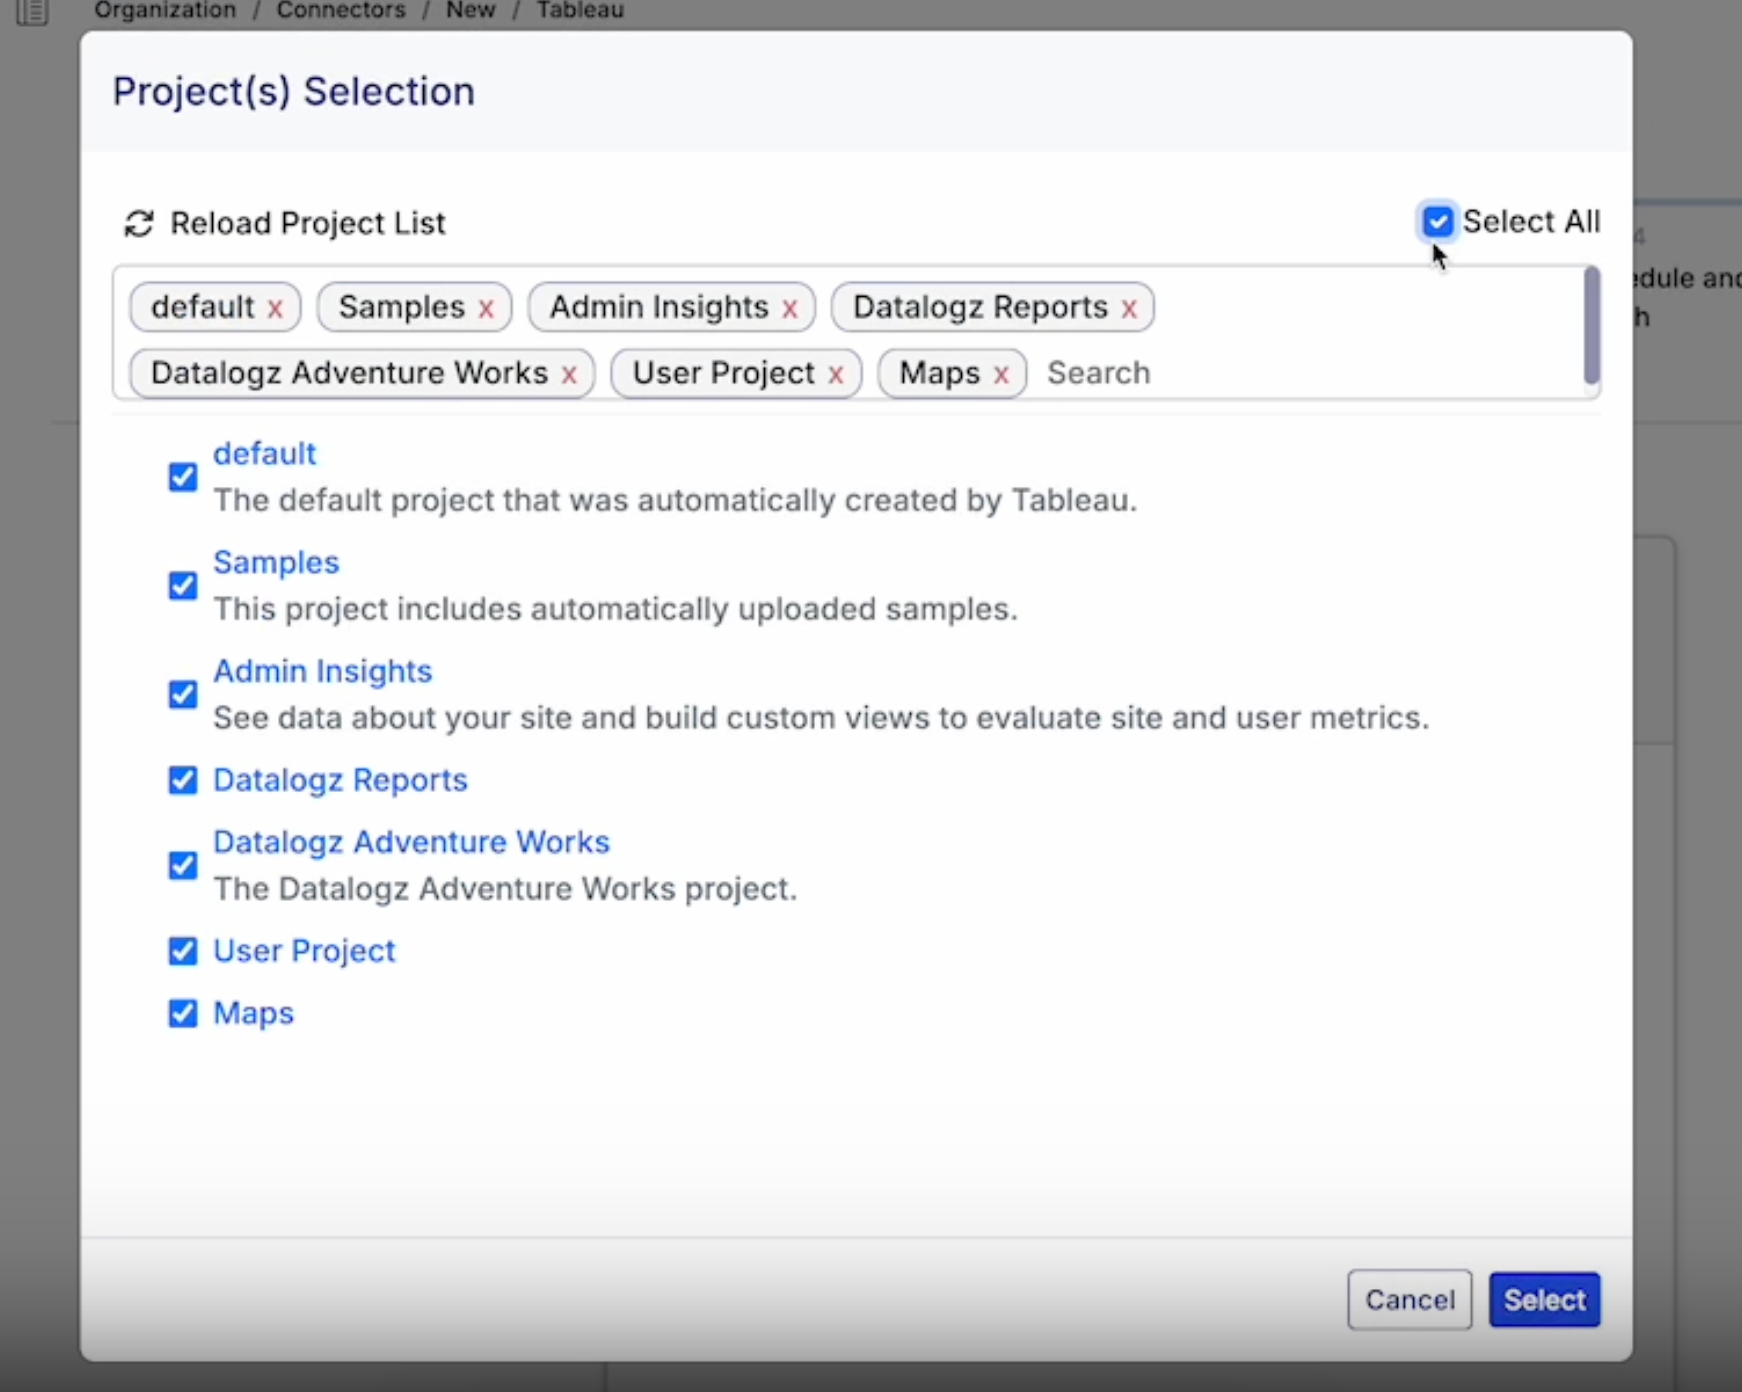
Name the connector select projects, and continue.
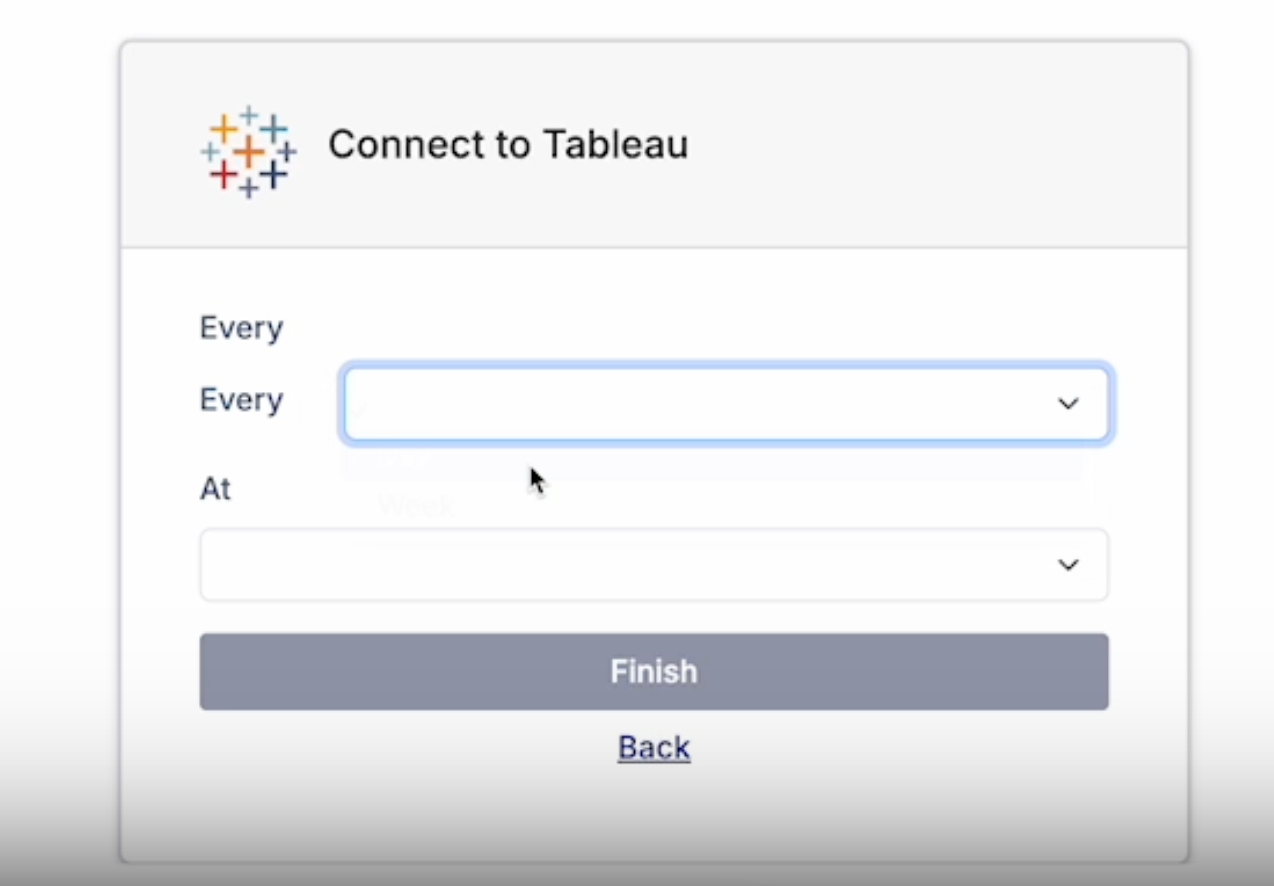
Set refresh schedule and finish the connector set up.
More information on personal access tokens and managing your account settings.
Or contact Datalogz support support@datalogz.io
This guide will walk you through how to set up PowerBI Connector in Datalogz via service principal. This method allows read-only access to PowerBI's administrative APIs for a single PowerBI tenant.
Time estimated: 6 mins
Azure App registration → https://portal.azure.com/#view/Microsoft_AAD_RegisteredApps/ApplicationsListBlade
Azure Group creation → https://portal.azure.com/#view/Microsoft_AAD_IAM/GroupsManagementMenuBlade/~/Overview
PowerBI configuration → https://app.powerbi.com/admin-portal/tenantSettings
Datalogz account & license activation -> contact customers@datalogz.io
Log in to your Datalogz account → https://app.datalogz.io/#/organization/connectors
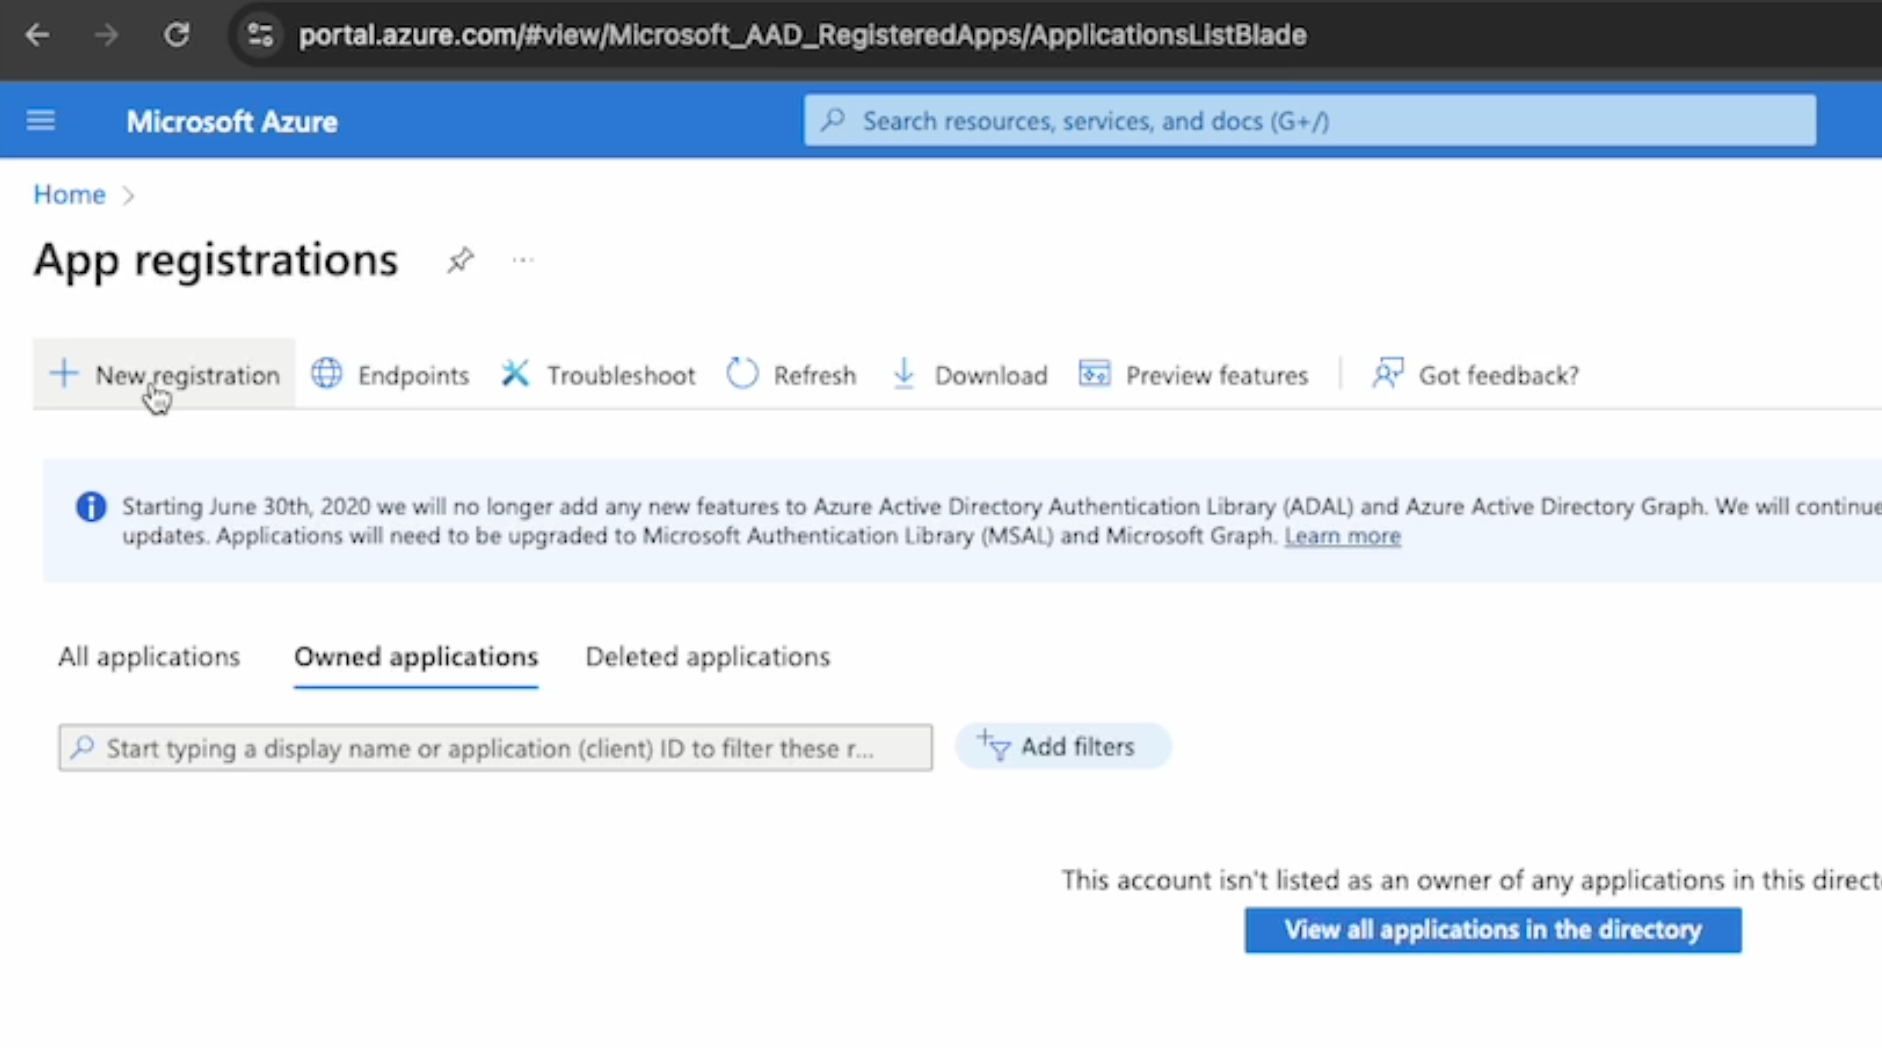
Open App registrations link -> https://portal.azure.com/#view/Microsoft_AAD_RegisteredApps/ApplicationsListBlade
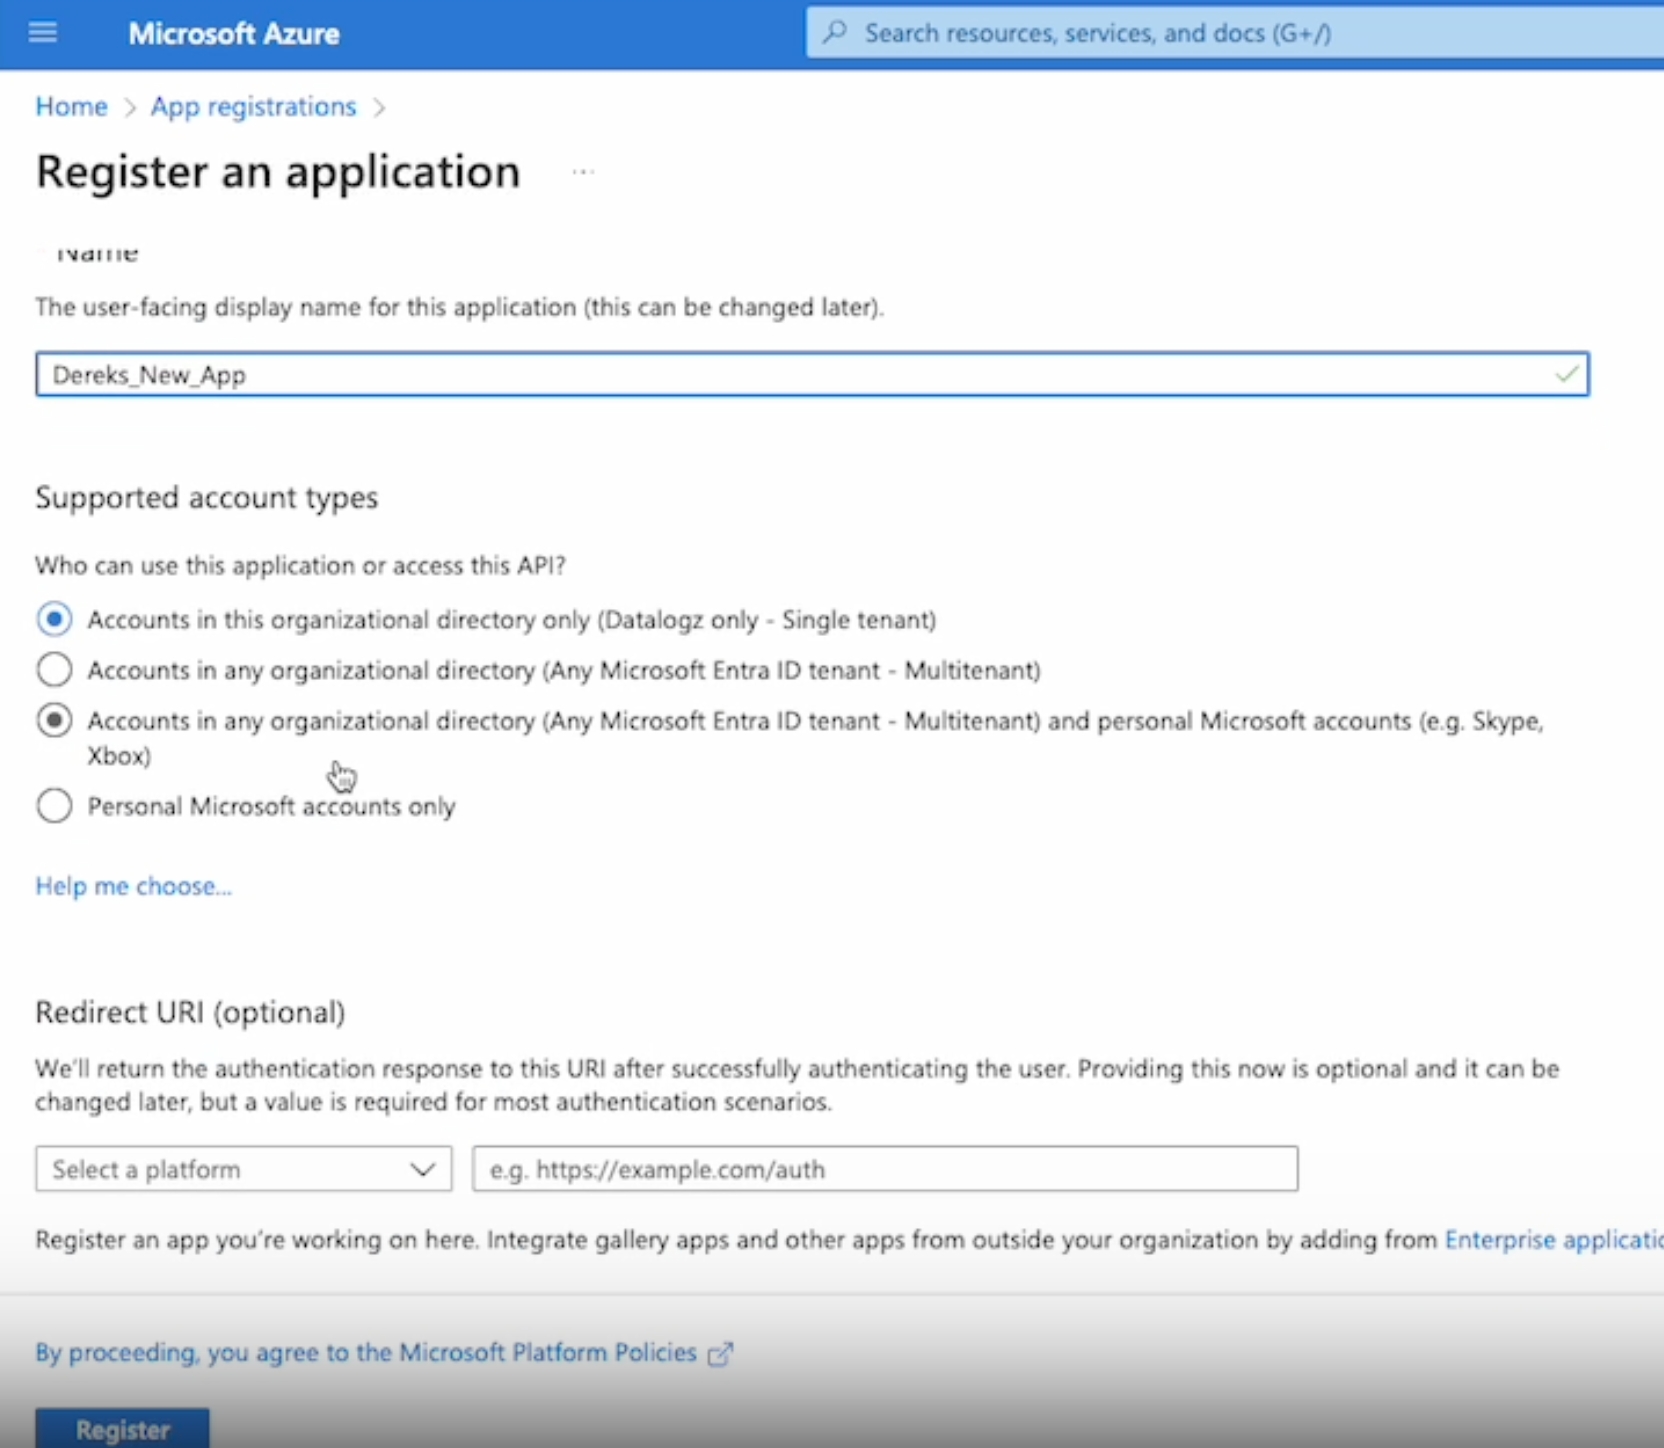
Create New Registration
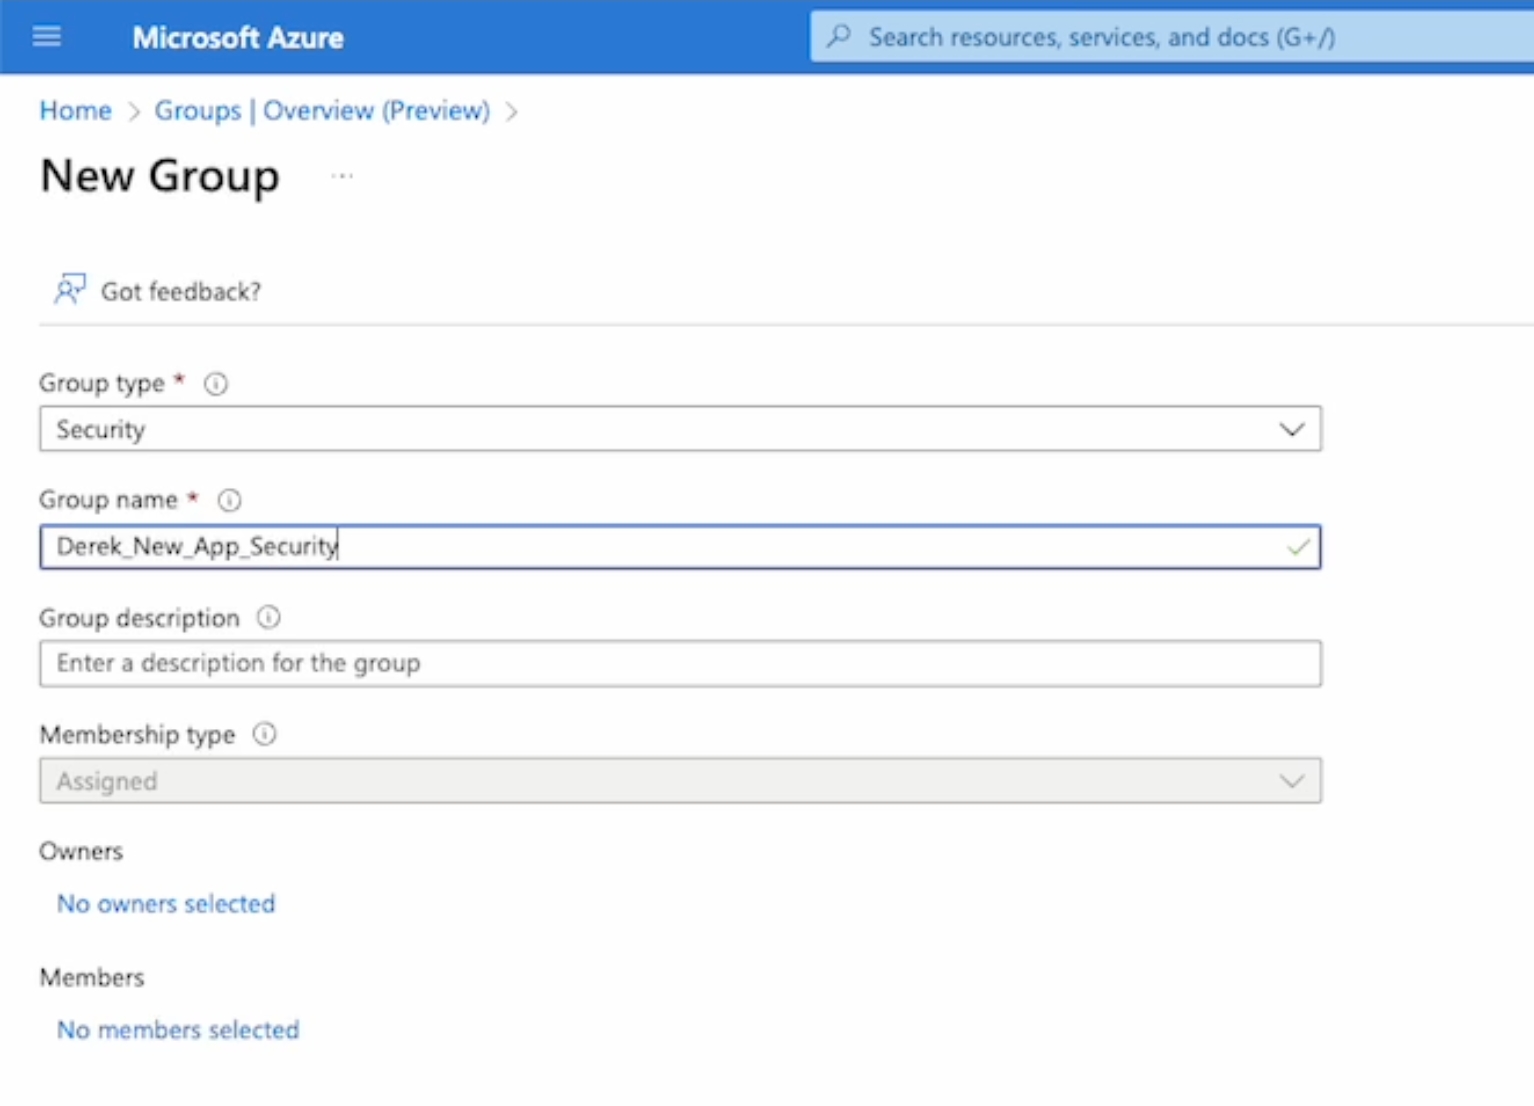
Create a name for your app, select single tenant (first option) as a supported account type, ignore the optional field as needed, and click Register at the bottom.
Application (client) ID & Directory (tenant) ID
Before continuing, please ensure you save all critical information (e.g., credentials, API keys, or configuration details) to a secure notepad or document for easy reference.
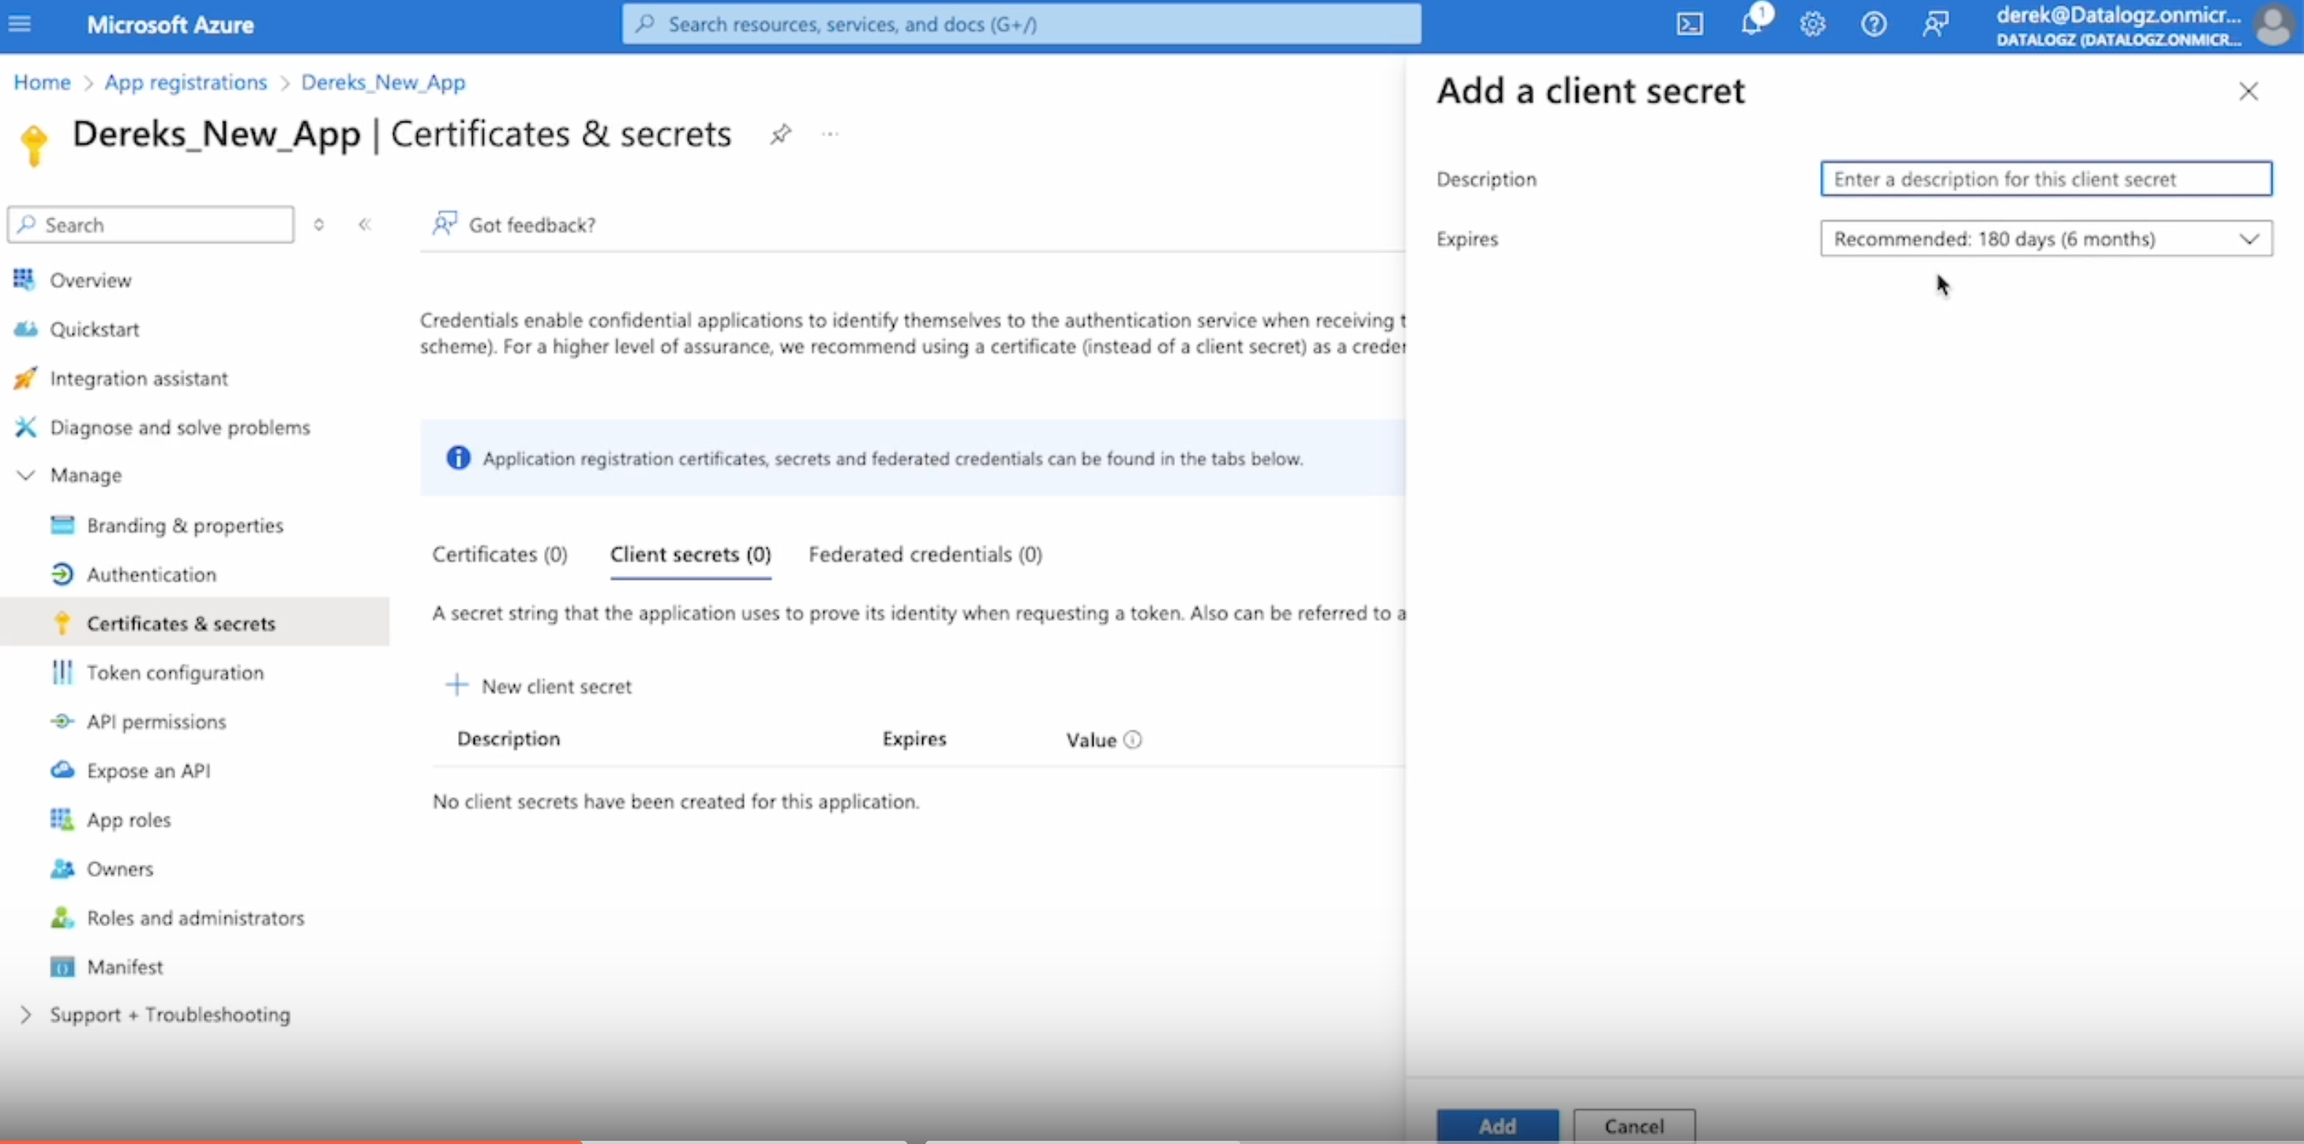
Client Secret Value
Under Manage in the side nav
Click Certificates & secrets & create new
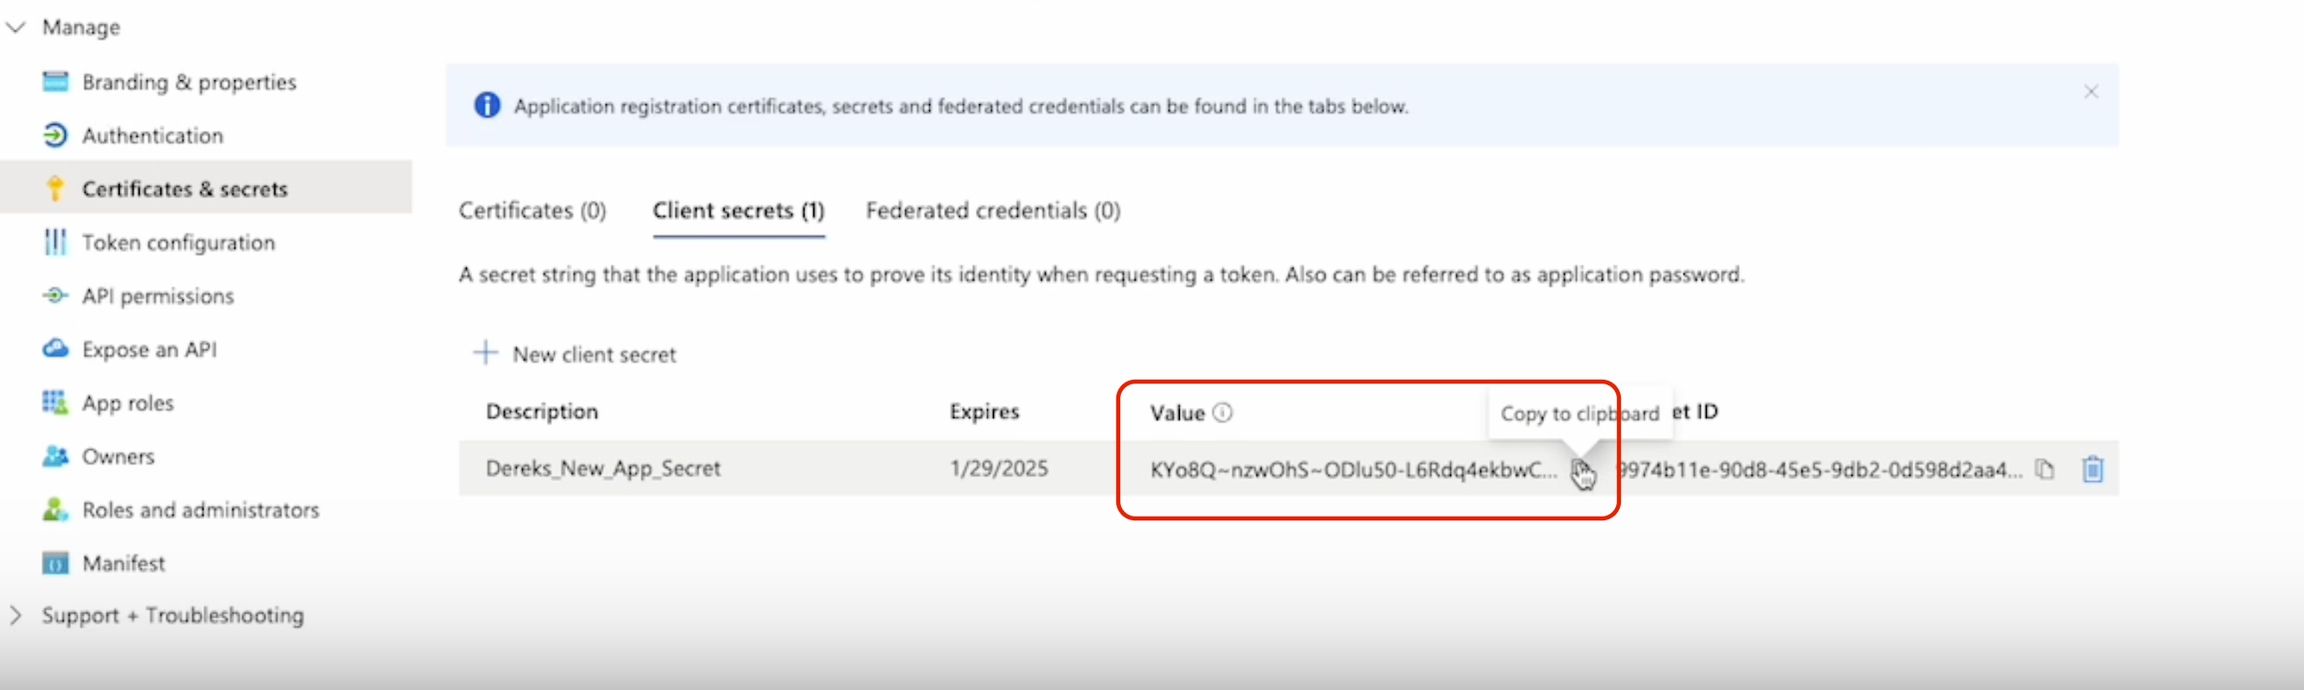
Find the Client Secret Value
The Client Secret Value will only be shown once during creation. If you refresh or navigate away, you won’t be able to view it again.
✅ Recommended Action: Copy and paste the client secret into your secure note-taking tool (e.g., Notepad, Notion, or a password manager) as soon as it's generated. If lost: You’ll need to generate a new client secret.
Grant Permissions for the new App Registration Here add permissions specifically for the Power
Tenant.ReadWrite.All
Dataset.ReadWrite.All
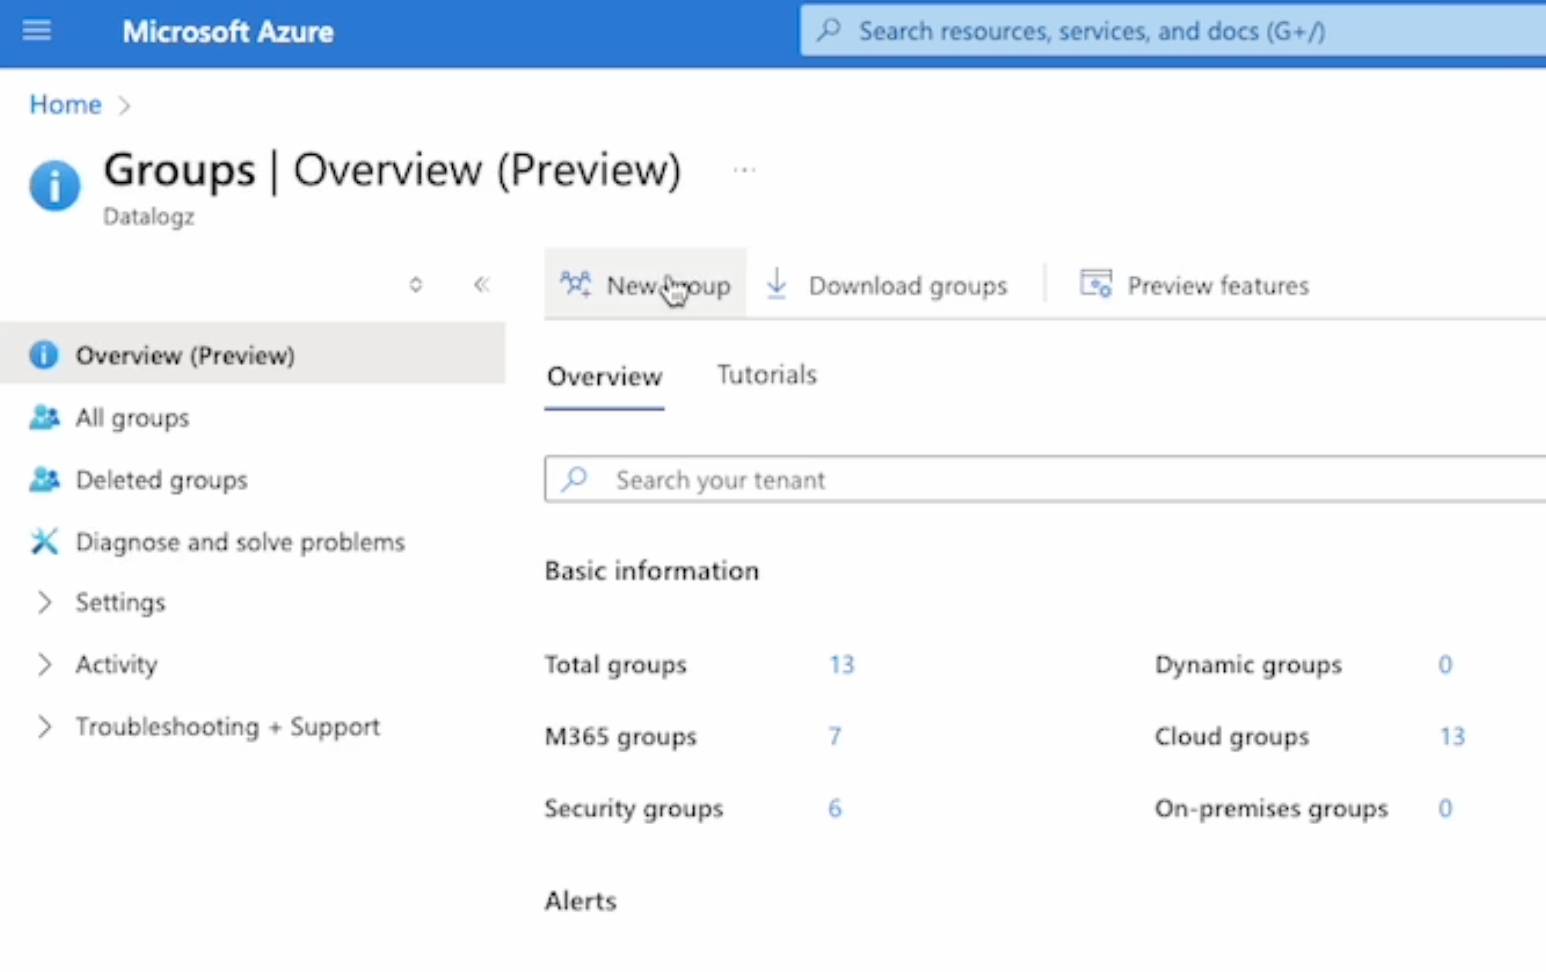
Click and open Azure Group link https://portal.azure.com/#view/Microsoft_AAD_IAM/GroupsManagementMenuBlade/~/Overview
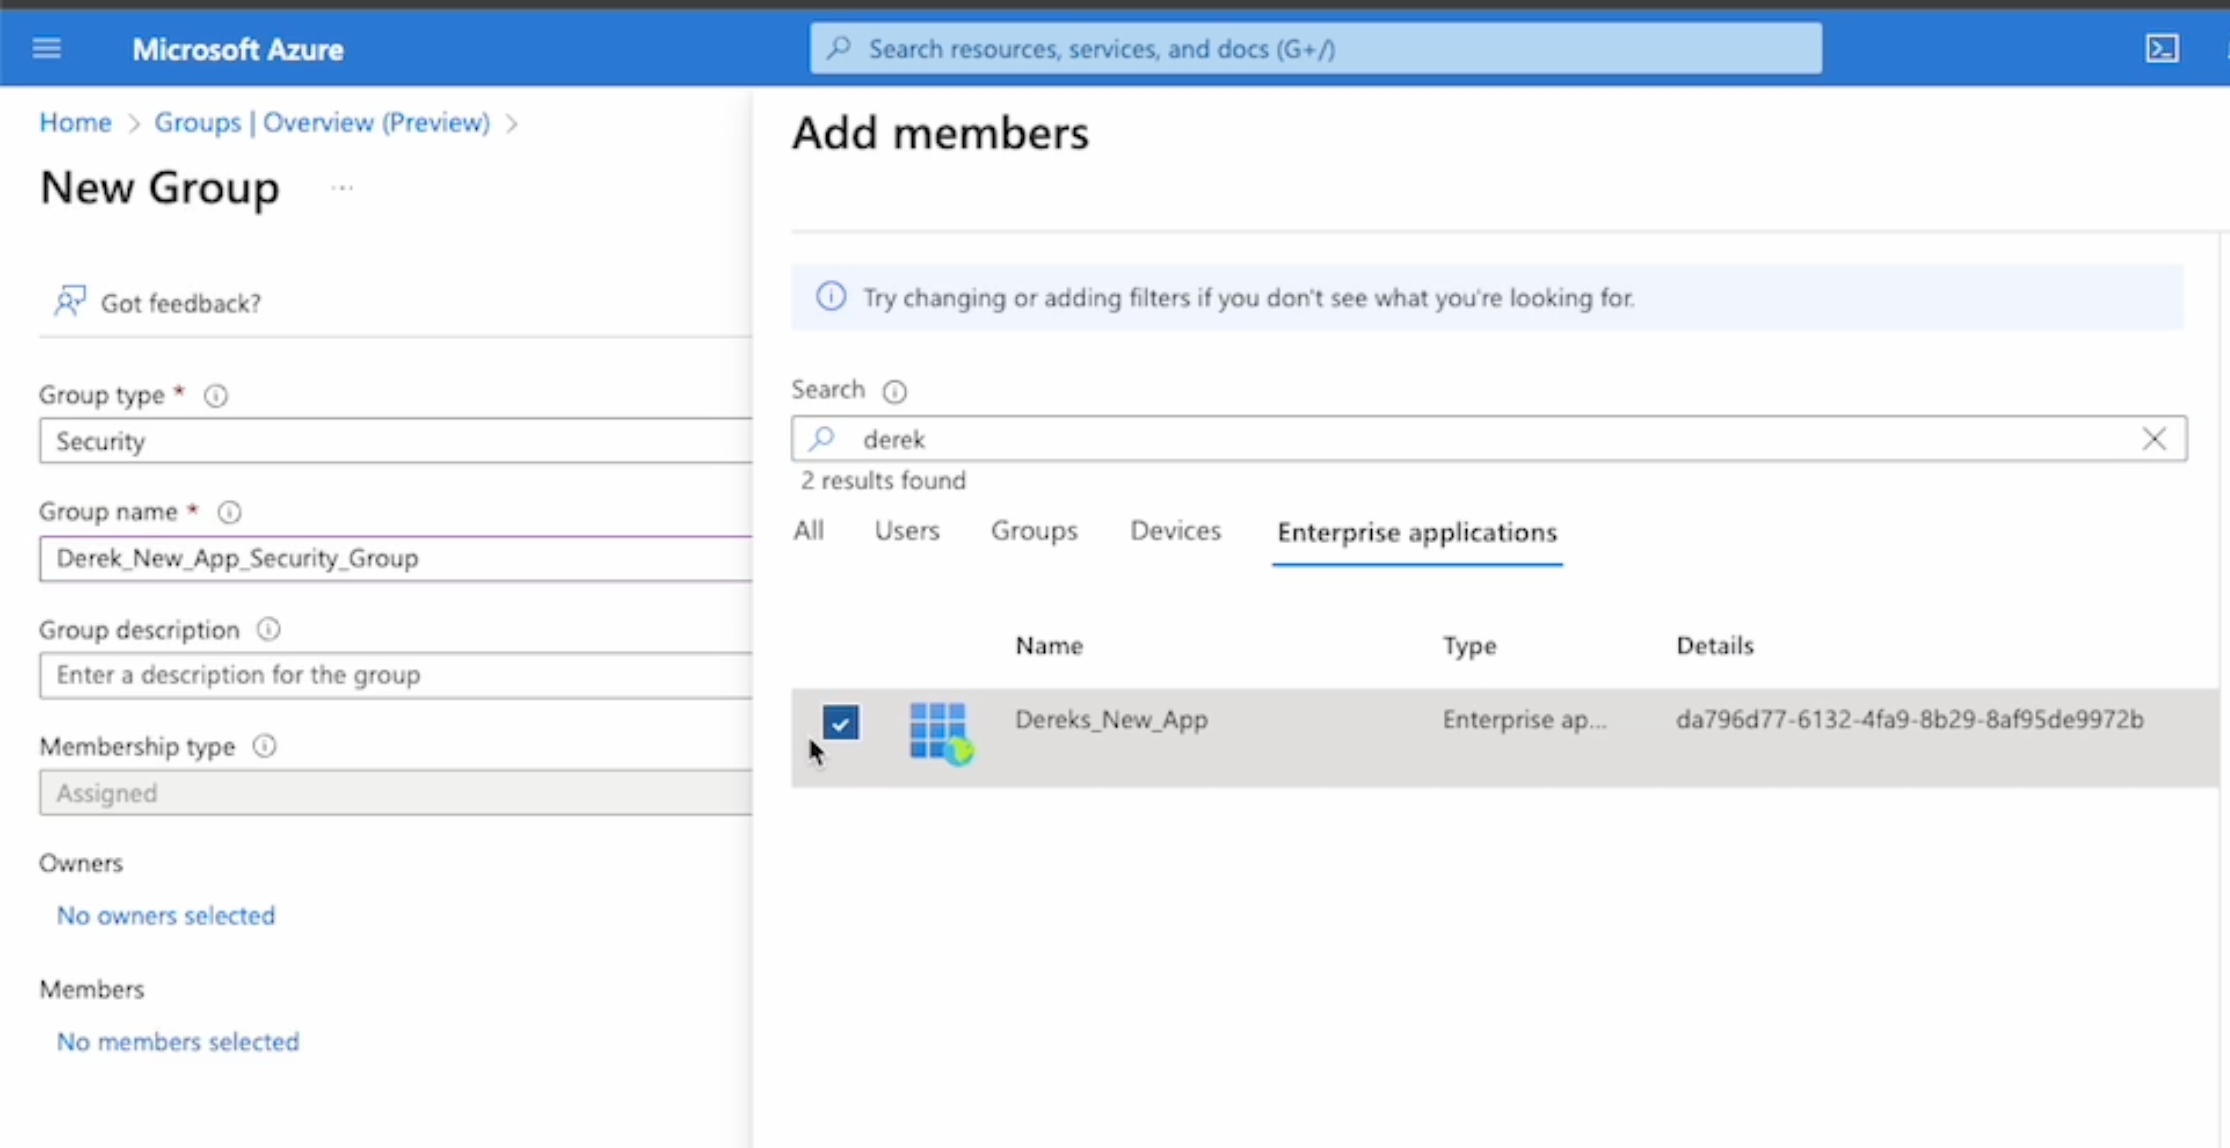
Create a new group
Add members by adding the new app to the Enterprise applications
Create new group
Open PowerBI Tenant Settings: https://app.powerbi.com/admin-portal/tenantSettings
In the Admin Portal's keyword search box type "XMLA", and in the Integration settings section enable "Allow XMLA endpoints and Analyze in Excel with on-premises semantic models"
In the Admin Portal's keyword search box type "fabric api" and enable "Service Princepals can use Fabric APIs"
In the Admin Portal's keyword search box type "admin api".
Enable all three Admin API settings and apply all newly created Groups.
Note: This configuration can take 15-25 mins for changes to work its way through PowerBI.
Important: License Activation Required
Before logging into your account, please ensure your license file is activated. Without activation, access to your account may be restricted.
Contact the Datalogz Team:
Send a request to activate your license file to customers@datalogz.io
Provide any relevant information (e.g., company name, user email) to speed up the process.
Log in to your Datalogz account
Navigate to Connector in the sidebar, and click New Connector
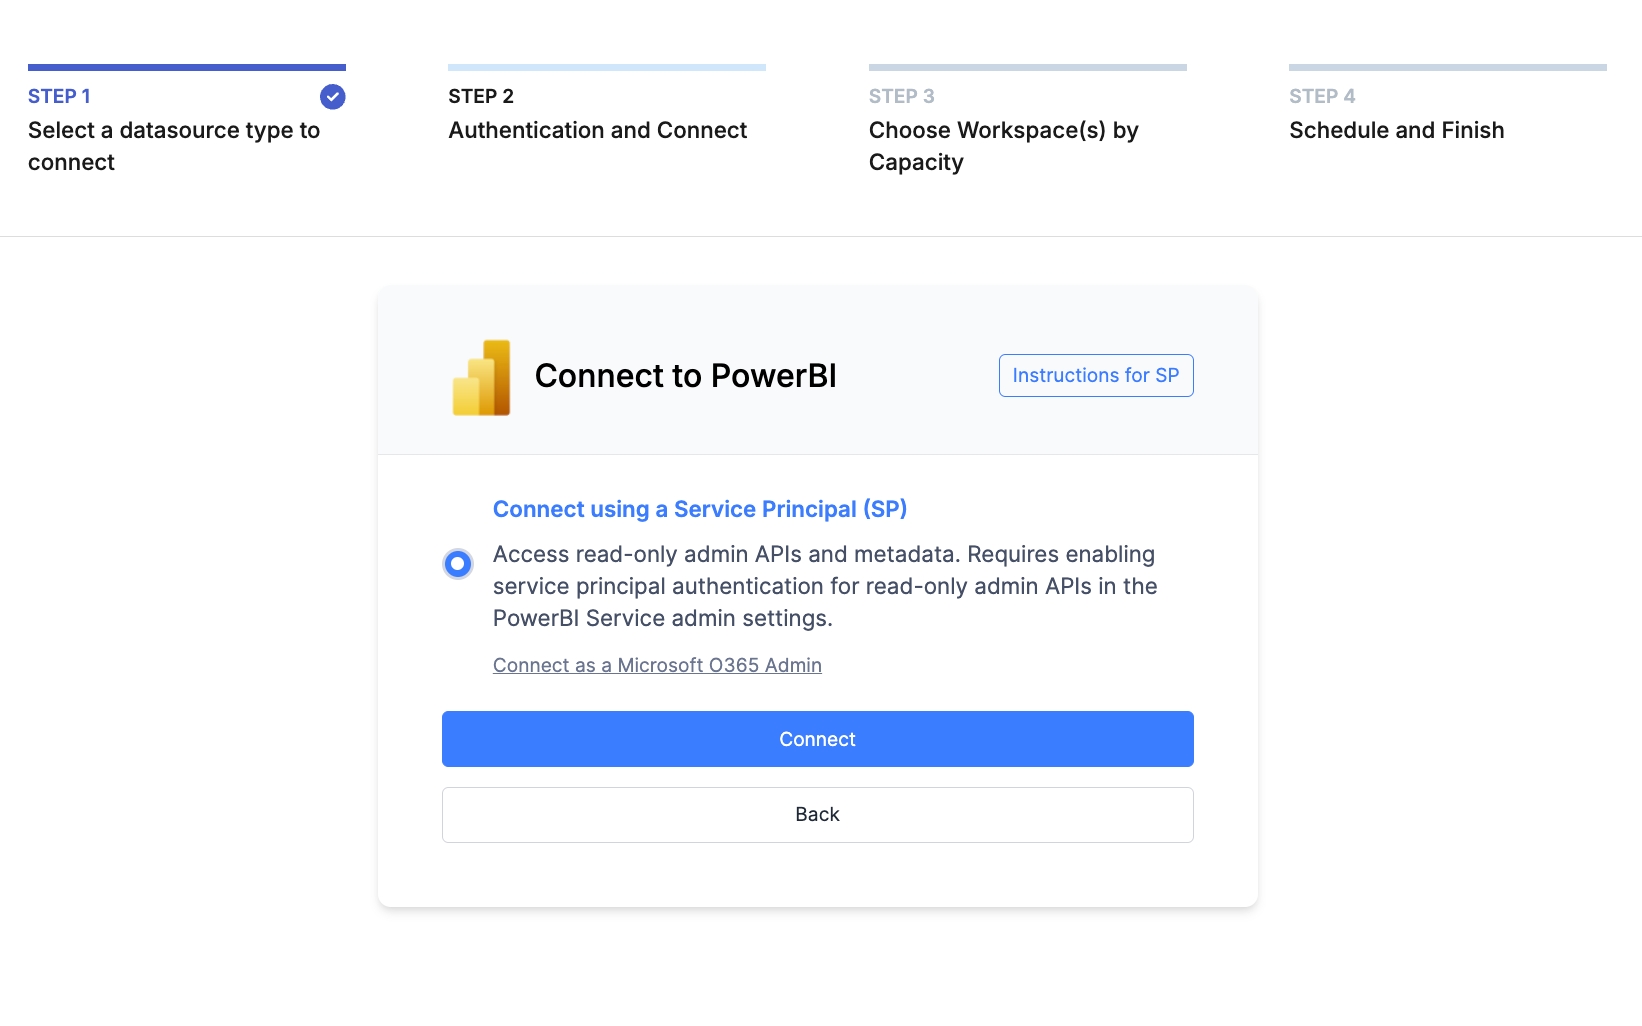
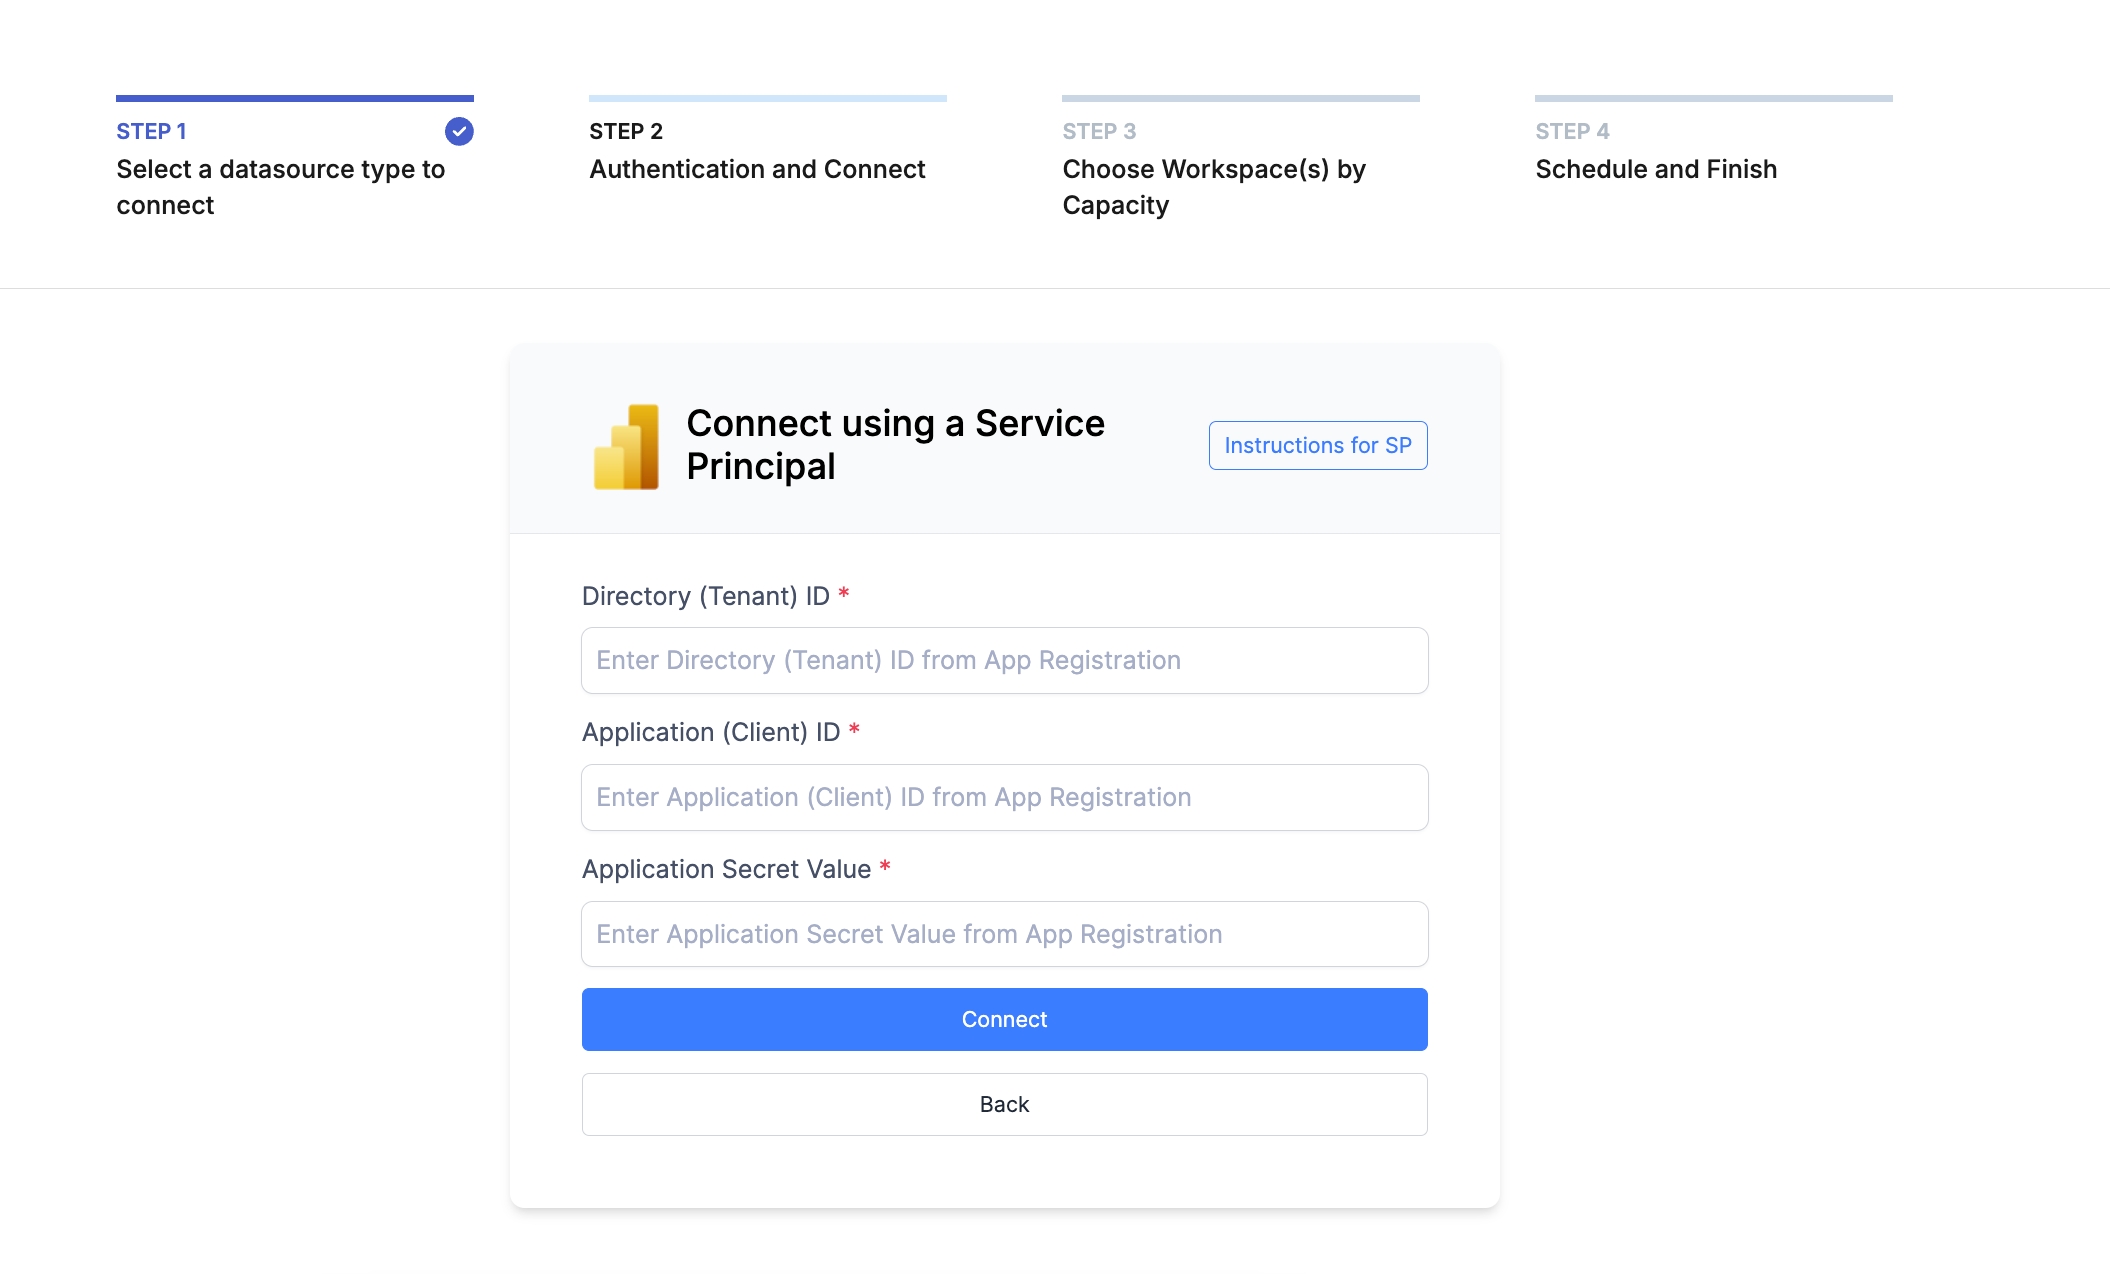
Choose PowerBI, and select Connect using a Service Principal (SP)
Copy-paste the new application information.
Directory (tenant) ID
Application (client) ID
Client Secret Value
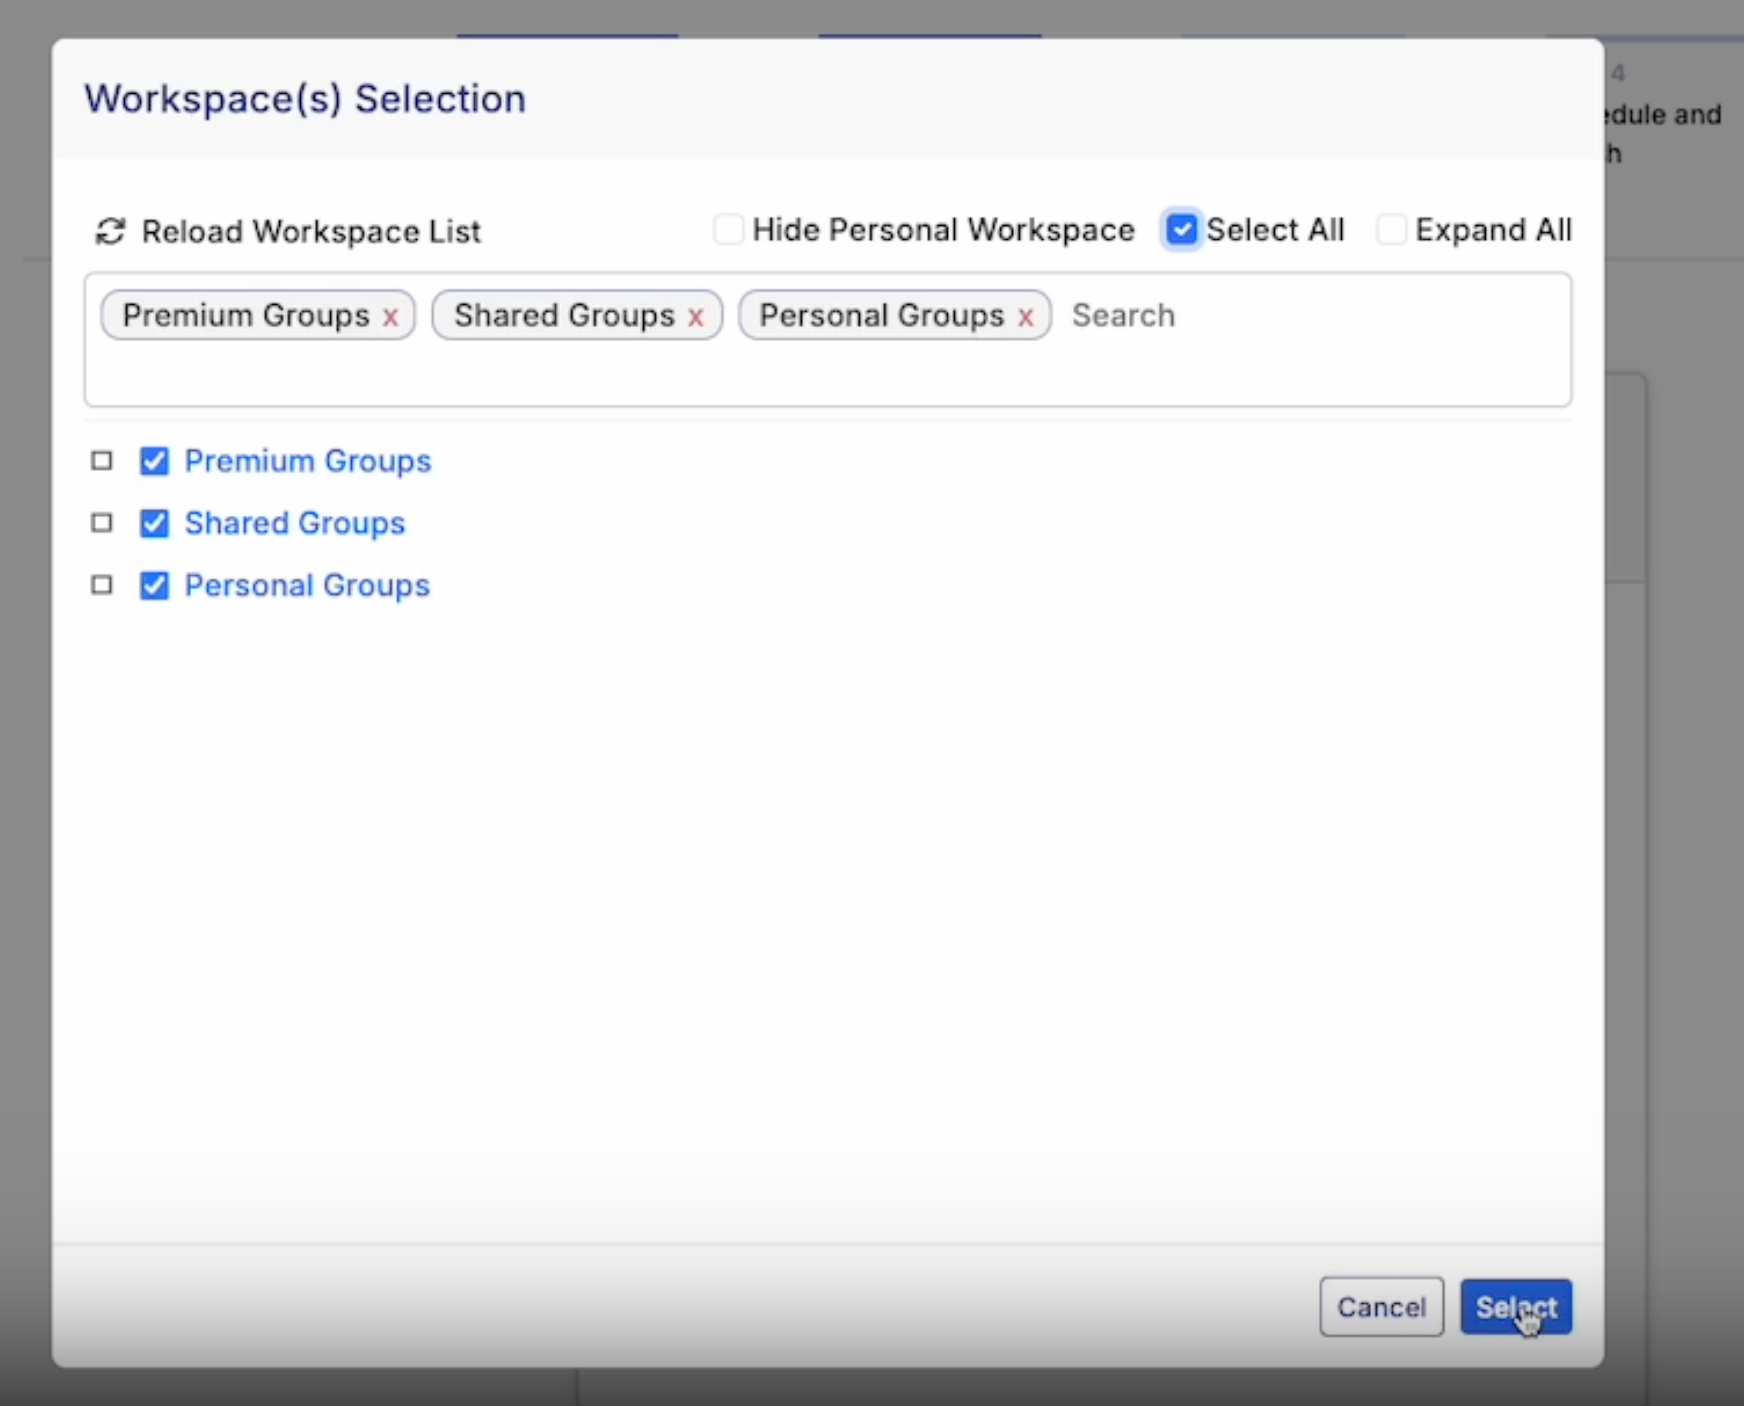
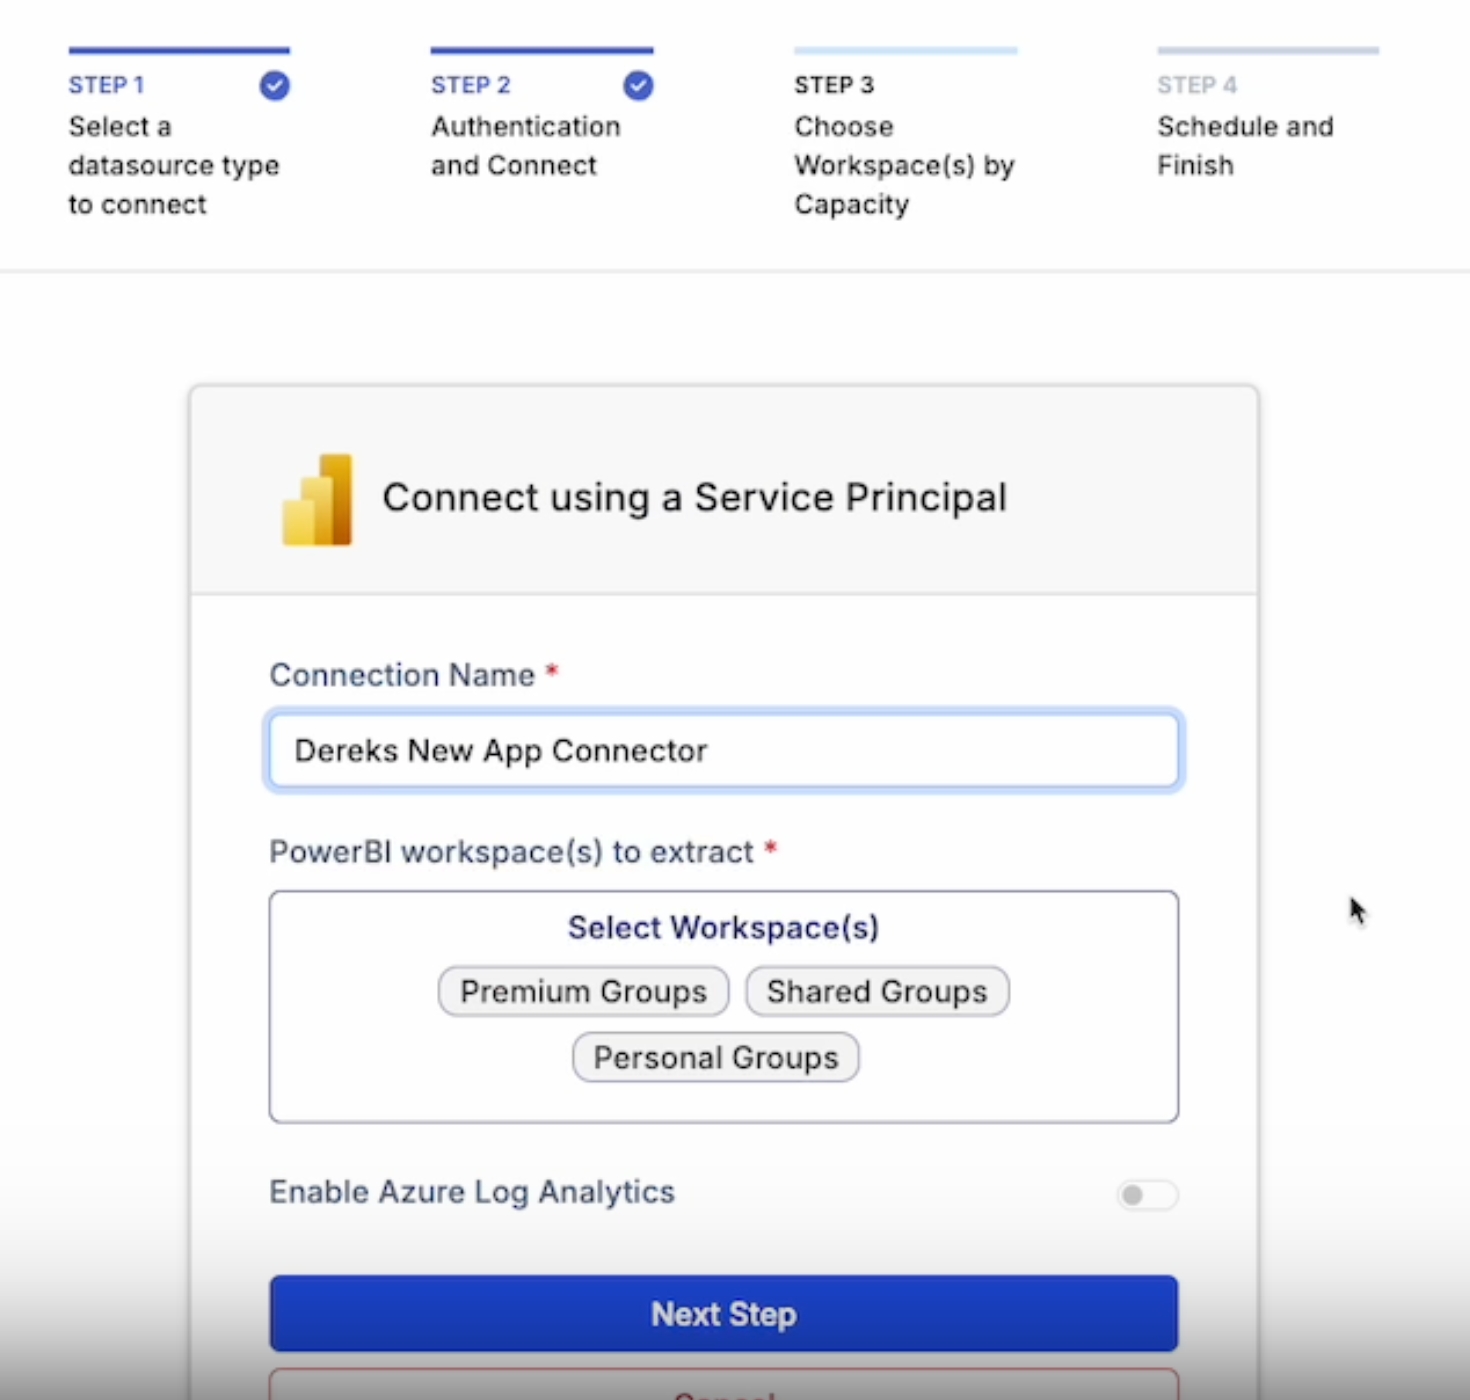
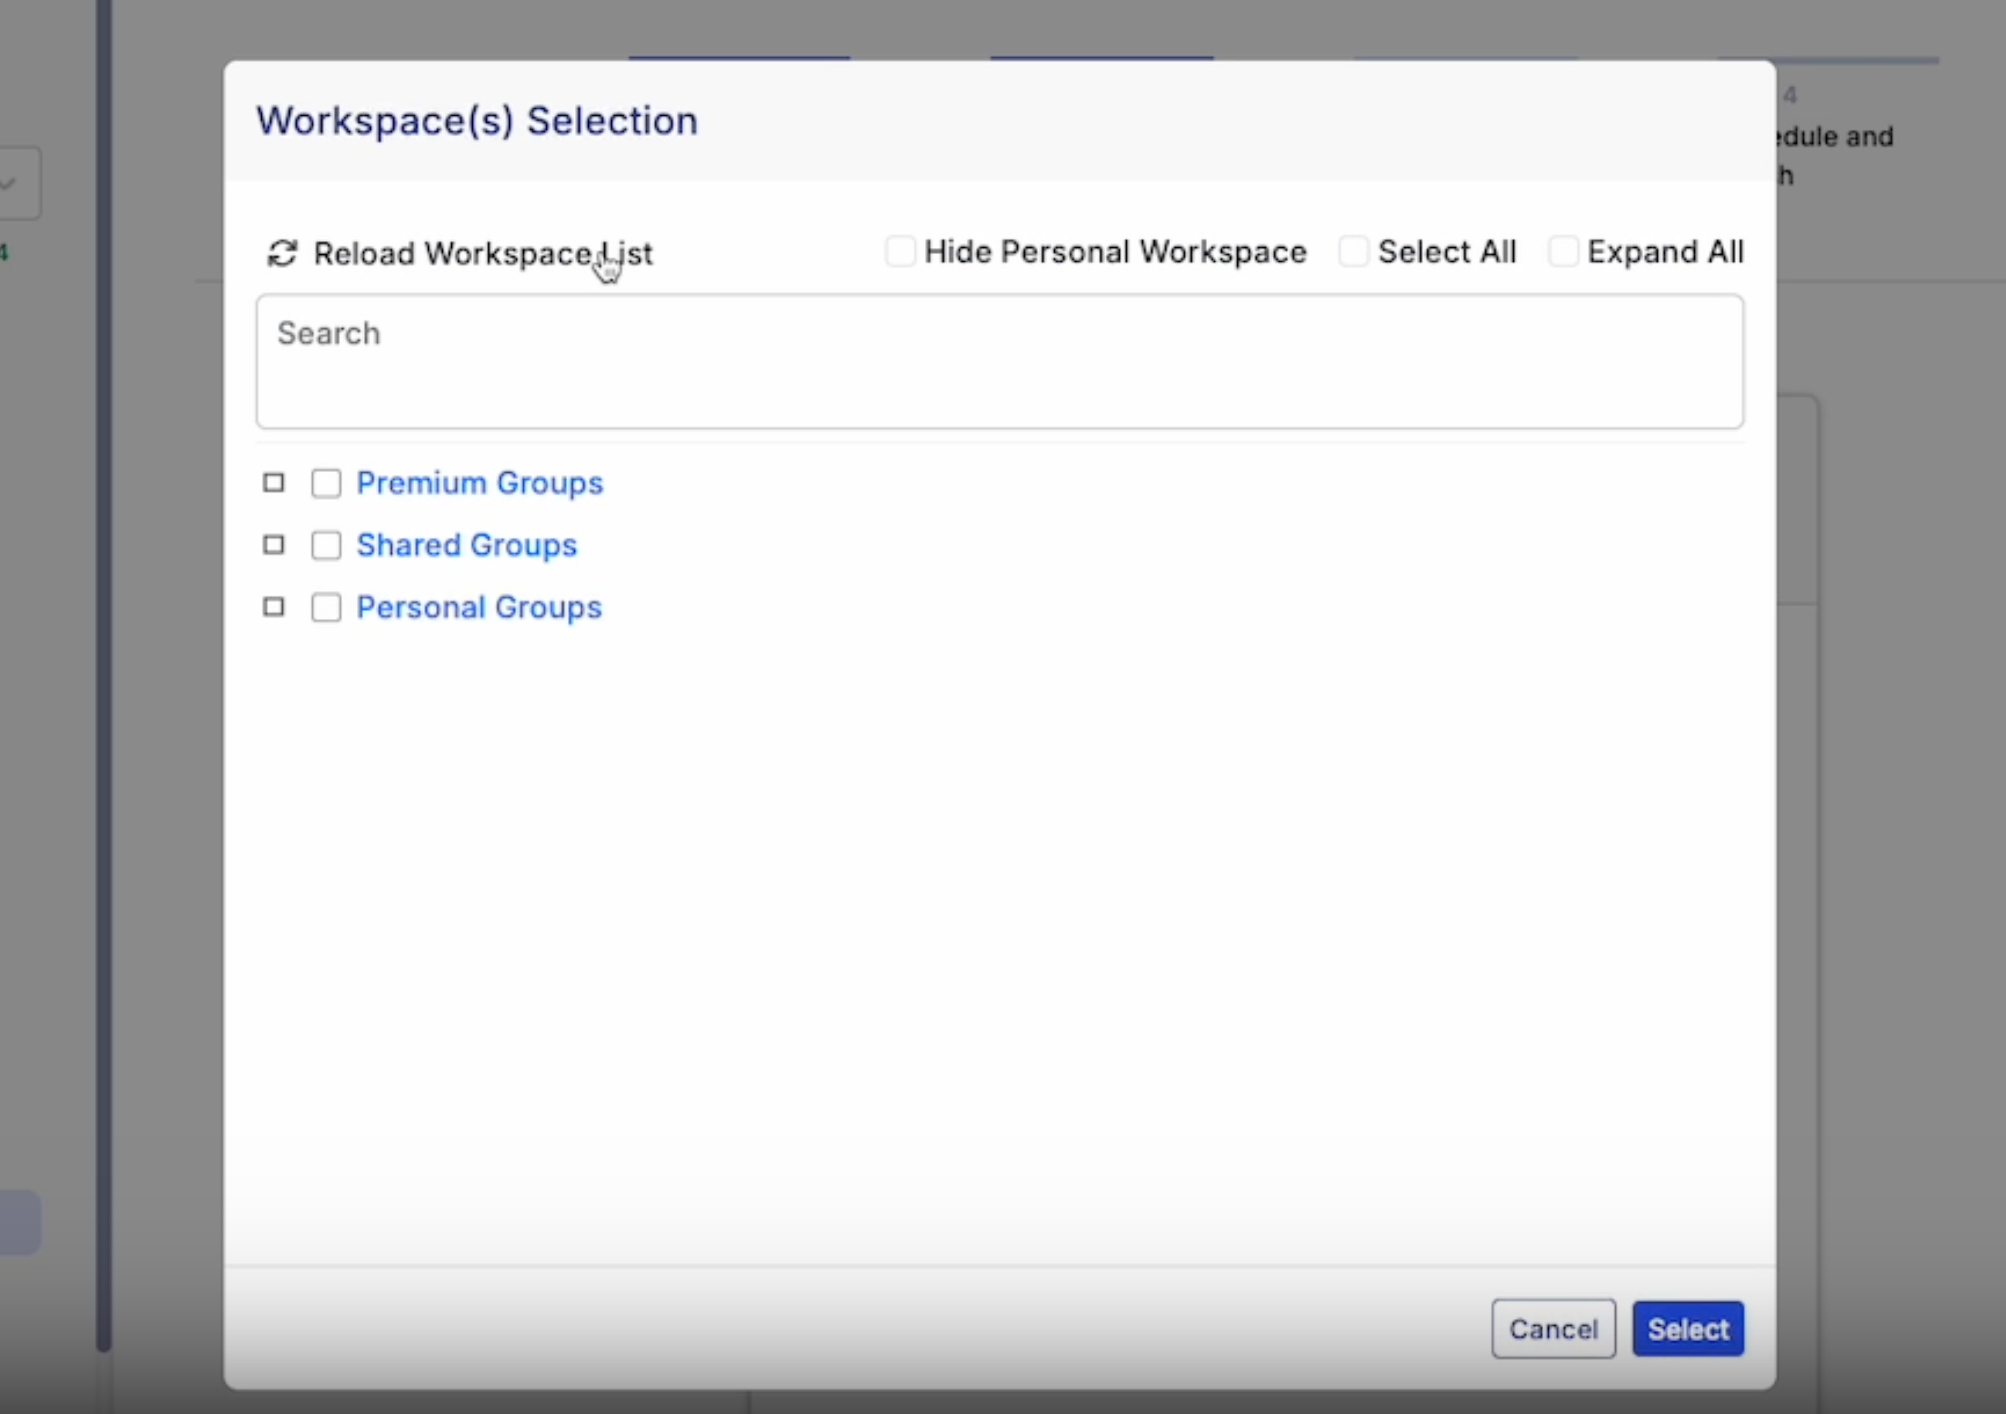
Select a PowerBI workspace
Reload Workspace and select all, option to expand and choose personal workspace
Rename Connection and Continue to Next Step.
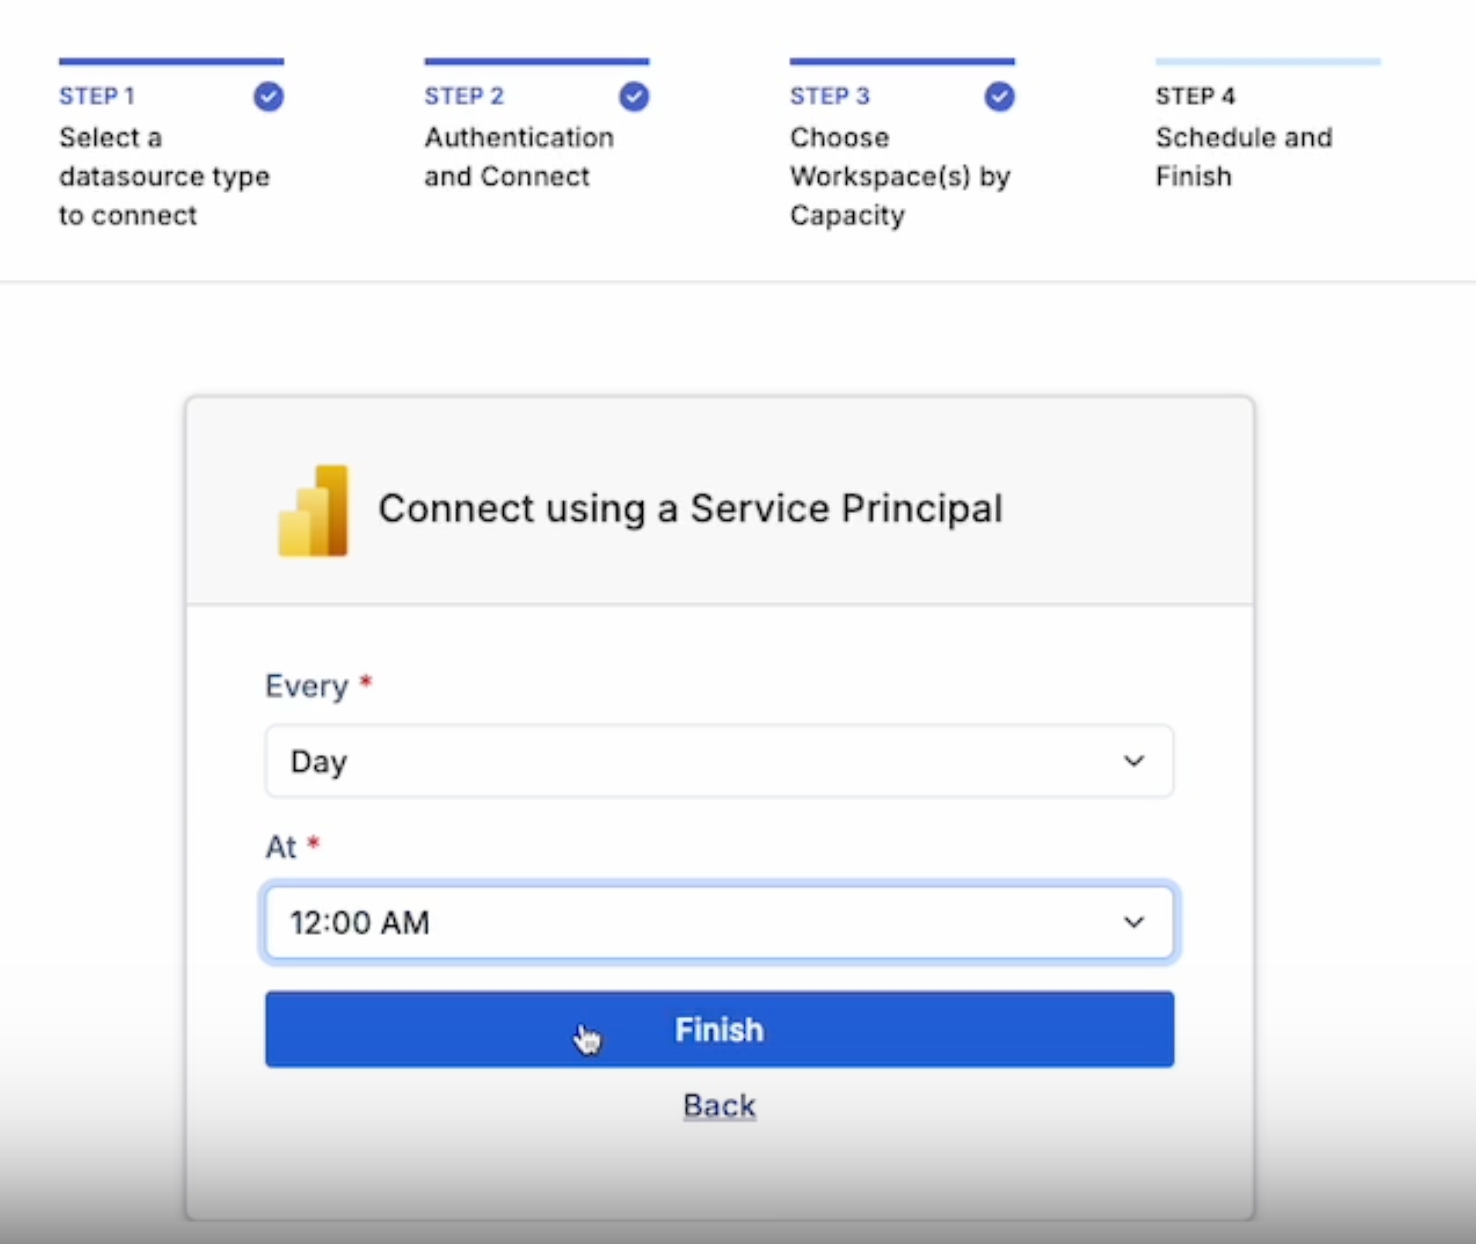
Schedule the Connector Refresh rate.
Refresh and click to view the new connector.
For more questions, please contact Datalogz support support@datalogz.io
Navigate to the Admin Portal and enable the Integration Setting for Semantic Model Execute Queries REST API. When enabled, users in the organization can query semantic models by using Data Analysis Expressions (DAX) through Power BI REST APIs.
The full documentation for the "Microsoft Fabric Capacity App" can be found in Microsoft's Doc pages. While you can use an existing Fabric Capacity Metrics app setup in PowerBI it's suggested to get the app again and setup a workspace specifically for use with Datalogz.
Install the Microsoft Fabric Capacity App in your Power BI environment. Navigate to the "Apps" section on the side bar of Power BI. There you can search for the "Microsoft Fabric Capacity App" and add it.
Navigate to the "Microsoft Fabric Capacity Metrics" Workspace that is created with the app. Go to Manage Access and grant "Admin" permissions to the Datalogz service principal Groups.
Run the app for the first time to start data flowing into the semantic model.
Provide the Dataset ID for the "Fabric Capacity Metrics" to Datalogz. This can be found in the URL when viewing the semantic model in your web browser.
Sample :
Root users and admins can manually invite, suspend, and promote members from the user's settings page.
To send an invitation:
Go to the Teams > Users
Click Invite Users.
Enter the invitee(s) email address, and assign the user type.
Click Add.
Click Send invites. New members will receive an invite link via email along with steps to join the workspace.
Root Admin have the highest organizational privilege and can only be assigned by the Datalogz team during the onboarding.
Root Admin are the only users who can:
View or edit connectors
Grant or remove Admin roles
Manage login methods
Create a new Team
Admins have the second highest privilege in assigned Teams and synced projects/workspace/streams.
Admins can
Invite and manage users
Rename Teams
Edit monitor and alerts
Admins can not
View or edit connectors
Delete a Team
Members are viewers and collaborators in assigned Teams, projects/workspaces/streams.
To delete a user from Datalogz
Go to Teams > Users
Find the member's name, and click on the delete icon in the same column
The user will be removed from Datalogz and unable to access it unless they are re-invited.
To remove a member from a Team
Go to Teams
Click on the Team's name
Deselect a member's name
The member will be removed from the Team and unable to access assigned projects/workspaces/streams. The member will remain a user in Datalogz.
Recommended Action: Copy and paste the information into your favorite text editor (e.g., Notepad, Notion, or Google Docs).